Discover easy & cute summer nails perfect for any occasion. Whether you’re a beginner or a pro, these designs offer simple and fun ideas for DIY nail art. Explore short nail designs, gel options, and cute toenail art ideas that are super easy to do at home. Follow step-by-step art tutorials for beginners and create beautiful nail designs in no time. Embrace the latest trends and find the best color combos for your summer nails.
Neon Mix & Match
Combining bright neon shades like orange and yellow can create a super vibrant and fun summer look. This mix-and-match design is perfect for those who love to play with colors and want something bold yet harmonious.

- Consumables:
- Base coat: Deborah Lippmann All About That Base
- Neon orange polish: China Glaze Nail Lacquer in “Orange Knockout”
- Neon yellow polish: Orly Nail Lacquer in “Glowstick”
- Top coat: INM Out the Door Top Coat
DIY Instructions:
- Apply a base coat.
- Alternate between neon orange and yellow polish on each nail.
- Apply a top coat to finish and protect your manicure.
Nude Sophistication
For a more understated look, nude nails are always a great choice. This simple and elegant design is perfect for any occasion and works well with any outfit.

- Consumables:
- Base coat: Essie Smooth-E Base Coat
- Nude polish: Sally Hansen Complete Salon Manicure in “Cafe Au Lait”
- Top coat: OPI Top Coat
DIY Instructions:
- Start with a base coat.
- Apply two coats of nude polish, ensuring smooth and even application.
- Finish with a top coat for a glossy, polished look.
Berry Beautiful
Berry-toned nails are a classic choice that never goes out of style. This rich, glossy hue is perfect for summer, adding a touch of elegance and vibrancy to your look. The high-shine finish makes the color pop, creating a sophisticated yet fun manicure.

- Consumables:
- Base coat: Essie Ridge Filling Base Coat
- Berry polish: OPI Nail Lacquer in “Berry Fairy Fun”
- Top coat: Seche Vite Dry Fast Top Coat
DIY Instructions:
- Apply a base coat to protect your nails and ensure smooth application.
- Apply two coats of berry polish, allowing each coat to dry completely.
- Finish with a top coat to seal in the color and add extra shine.
Lavender Leopard
This playful lavender design features an accent nail with a chic leopard print, adding a fun twist to the soft purple base. It’s a great way to incorporate animal print into your summer manicure while keeping it cute and subtle.

- Consumables:
- Base coat: Orly Bonder Rubberized Base Coat
- Lavender polish: Essie Nail Polish in “Lilacism”
- Black polish for leopard spots: Sally Hansen Insta-Dri in “Black to Black”
- Top coat: CND Vinylux Weekly Top Coat
DIY Instructions:
- Apply a base coat to your nails.
- Paint most of your nails with lavender polish, leaving one or two nails for the leopard print.
- Using a dotting tool or a thin brush, create leopard spots with black polish on the accent nails.
- Seal the look with a top coat to protect your design.
Strawberry Delight
This adorable nail art features cute strawberry designs that scream summer. The combination of bright pink polish and intricate strawberry patterns makes for a sweet and eye-catching manicure perfect for sunny days.

- Consumables:
- Base coat: Deborah Lippmann All About That Base
- Pink polish: China Glaze Nail Lacquer in “Make an Entrance”
- Green polish for leaves: Essie Nail Polish in “Mojito Madness”
- White polish for seeds: OPI Nail Lacquer in “Alpine Snow”
- Top coat: INM Out the Door Top Coat
DIY Instructions:
- Start with a base coat to protect your nails.
- Apply two coats of pink polish for the base color.
- Use a thin nail art brush to paint strawberry designs on your nails, starting with the red berries, then adding green leaves and white seeds.
- Finish with a top coat to seal your design and add shine.
Minimalist Lavender
This minimalist lavender design features simple yet striking red geometric accents, perfect for those who love a modern and clean look. The combination of soft lavender and bold red creates a unique and stylish manicure.
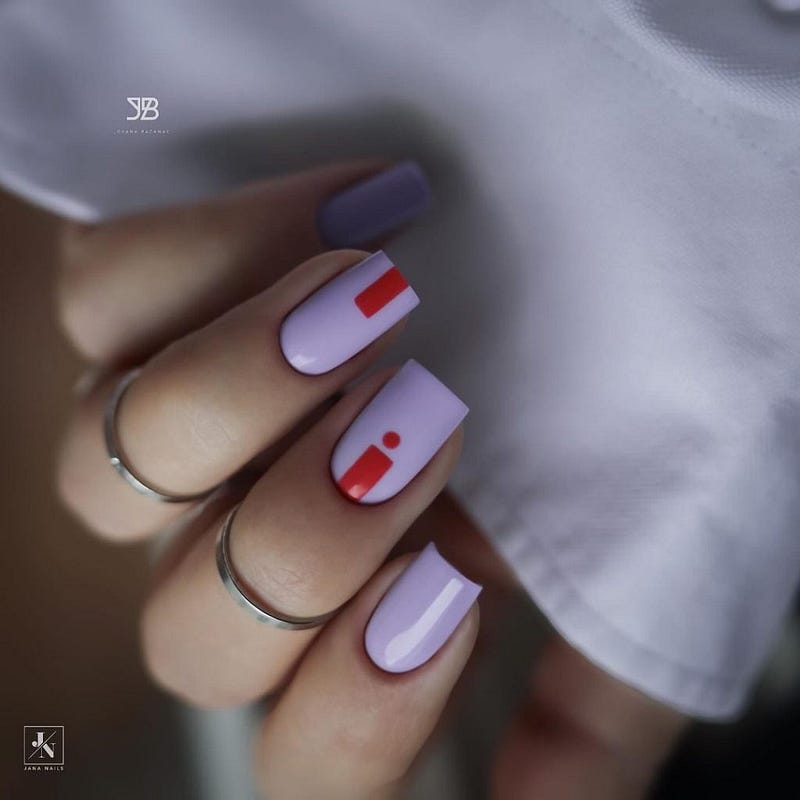
- Consumables:
- Base coat: Essie Smooth-E Base Coat
- Lavender polish: Zoya Nail Polish in “Malia”
- Red polish for accents: Essie Nail Polish in “Really Red”
- Thin nail art brush or striping tape
- Top coat: OPI Top Coat
DIY Instructions:
- Apply a base coat to smooth out your nails.
- Paint all your nails with lavender polish.
- Use a thin nail art brush or striping tape to create geometric red accents on selected nails.
- Finish with a top coat to protect your design and add a glossy finish.
Coral Crush
Bright coral nails are perfect for summer, adding a pop of color that complements sun-kissed skin. This vibrant hue is ideal for beach outings and summer parties, giving your nails a fresh and lively look.

- Consumables:
- Base coat: OPI Natural Nail Base Coat
- Coral polish: Sally Hansen Miracle Gel in “Get Mod”
- Top coat: Essie Gel Couture Top Coat
DIY Instructions:
- Start with a base coat to protect your nails and ensure long-lasting color.
- Apply two coats of coral polish, allowing each coat to dry fully.
- Seal the manicure with a top coat for a durable and shiny finish.
Classic Red Nails
Red nails are a timeless classic that never goes out of style. This bright red manicure is bold and sophisticated, making a striking statement. The glossy finish adds an extra touch of elegance, perfect for any occasion.
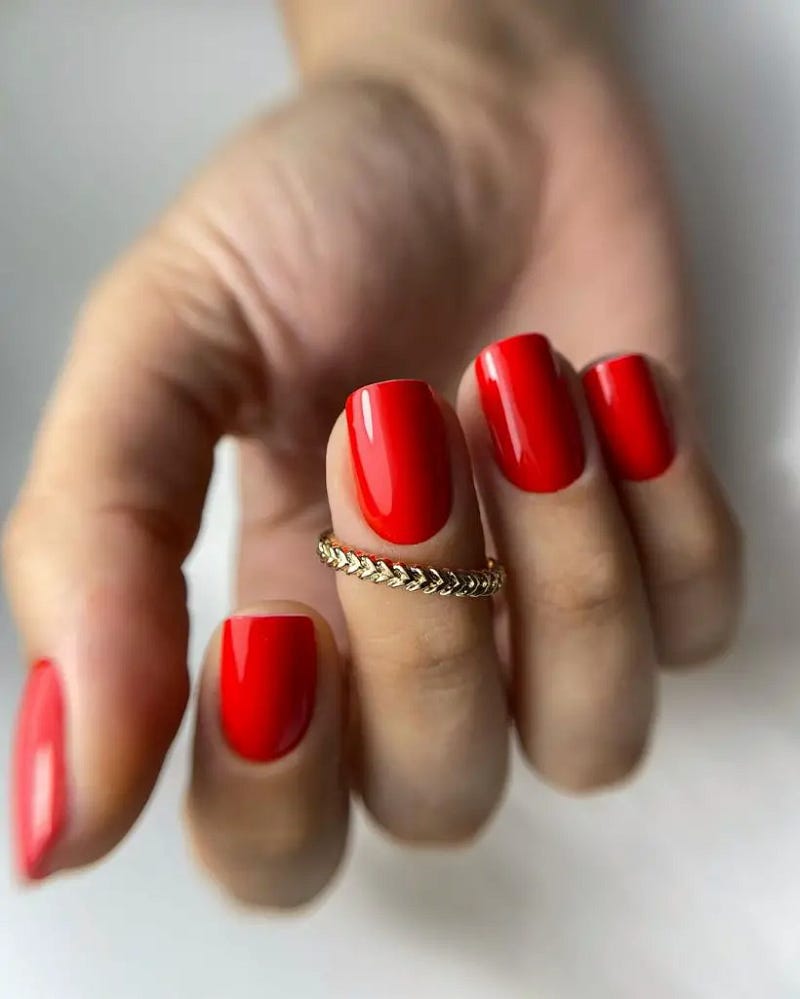
- Consumables:
- Base coat: Essie Ridge Filling Base Coat
- Red polish: OPI Nail Lacquer in “Big Apple Red”
- Top coat: Seche Vite Dry Fast Top Coat
DIY Instructions:
- Apply a base coat to protect your nails.
- Apply two coats of red polish, allowing each coat to dry completely.
- Finish with a top coat to seal in the color and add a glossy finish.
Neon Green Manicure
Neon green nails are a fun and vibrant choice for summer. This bold color is perfect for making a statement and is sure to turn heads. The glossy finish enhances the brightness of the color, making it pop even more.
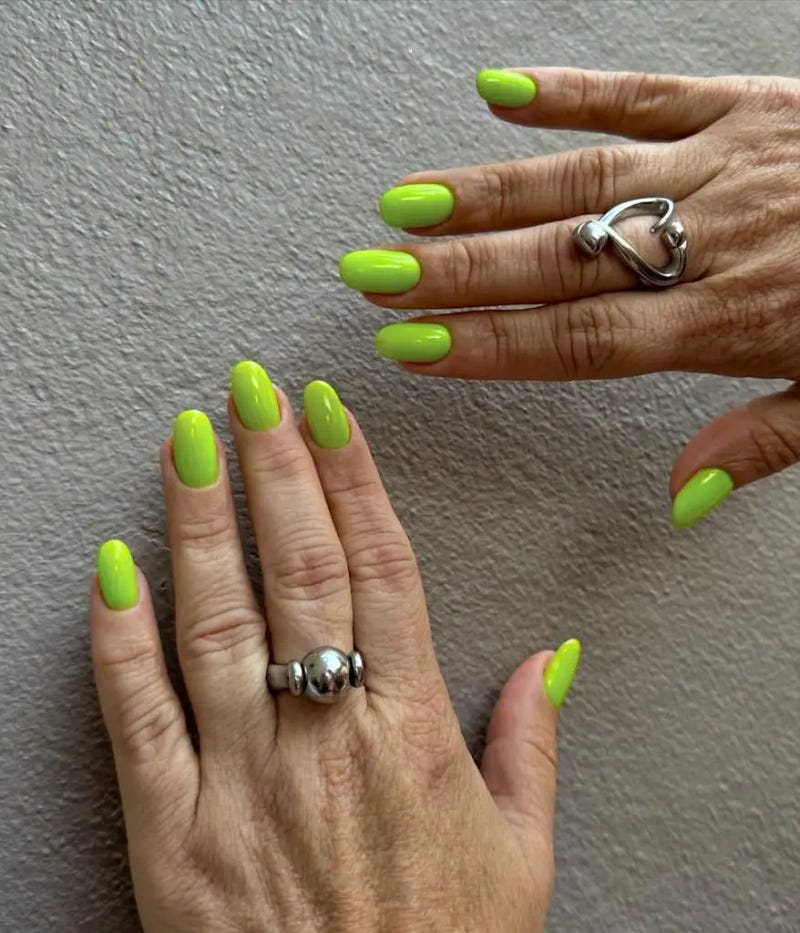
- Consumables:
- Base coat: Orly Bonder Rubberized Base Coat
- Neon green polish: China Glaze Nail Lacquer in “Lime After Lime”
- Top coat: CND Vinylux Weekly Top Coat
DIY Instructions:
- Apply a base coat to protect your nails.
- Apply two coats of neon green polish, allowing each coat to dry completely.
- Finish with a top coat to seal in the color and add shine.
Pastel Swirls
This pastel swirl design is both elegant and playful, perfect for summer. The combination of light blue and white creates a serene and refreshing look. The swirls add a touch of creativity and fun.

- Consumables:
- Base coat: Deborah Lippmann All About That Base
- Light blue polish: Essie Nail Polish in “Bikini So Teeny”
- White polish: OPI Nail Lacquer in “Alpine Snow”
- Nail art brush for swirls
- Top coat: INM Out the Door Top Coat
DIY Instructions:
- Apply a base coat to your nails.
- Paint your nails with the light blue polish.
- Use a nail art brush to create white swirls on each nail.
- Finish with a top coat to protect your design and add shine.
Deep Blue With Accent Nail
This deep blue manicure is sophisticated and elegant. The glossy blue nails are complemented by a single accent nail featuring a sleek design, adding an extra touch of style.
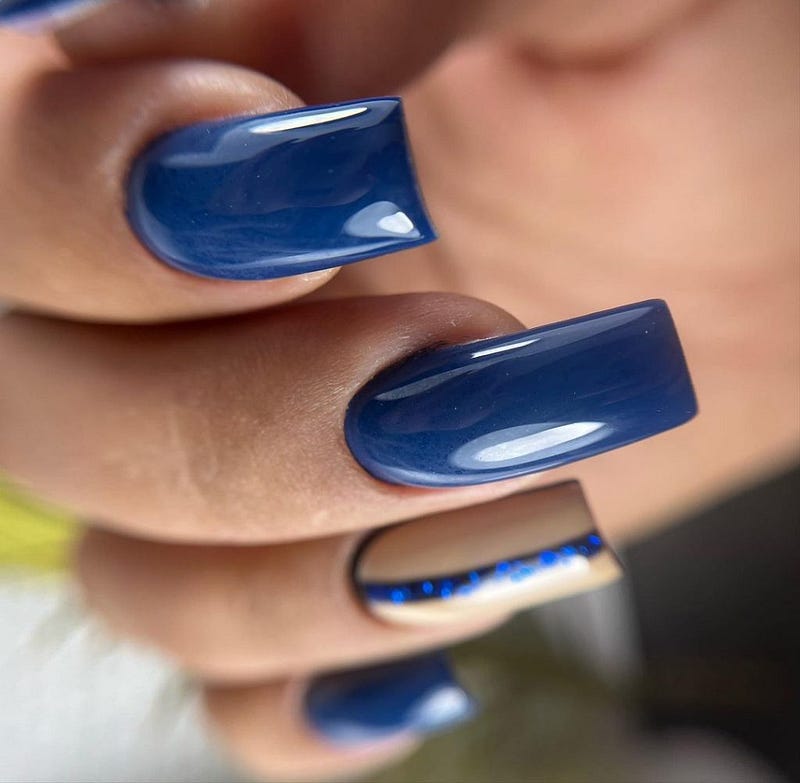
- Consumables:
- Base coat: OPI Natural Nail Base Coat
- Blue polish: Essie Nail Polish in “Aruba Blue”
- Silver polish for accent: China Glaze Nail Lacquer in “Cheers to You”
- Top coat: Seche Vite Dry Fast Top Coat
DIY Instructions:
- Apply a base coat to protect your nails.
- Apply two coats of blue polish on all nails except the accent nail.
- Paint the accent nail with silver polish and add any desired design.
- Finish with a top coat to seal the colors and add shine.


No comments:
Post a Comment