Discover the latest in nail fashion with our classy summer nails shades & designs. This season, opt for dark, rich browns or clean, bright whites, enhanced with simple casual art or glitter highlights. Perfect for any nail shape, from squoval to long, these designs provide a sophisticated touch to your summer aesthetic
Sophisticated Blue Marble
Marble nails are an artistic and eye-catching choice, especially in blue shades that remind us of the ocean. This intricate design uses swirling blue patterns with hints of gold to create a mesmerizing effect. The use of blue and white captures the essence of a breezy summer day by the sea, making it a fantastic option for beach outings or casual hangouts.
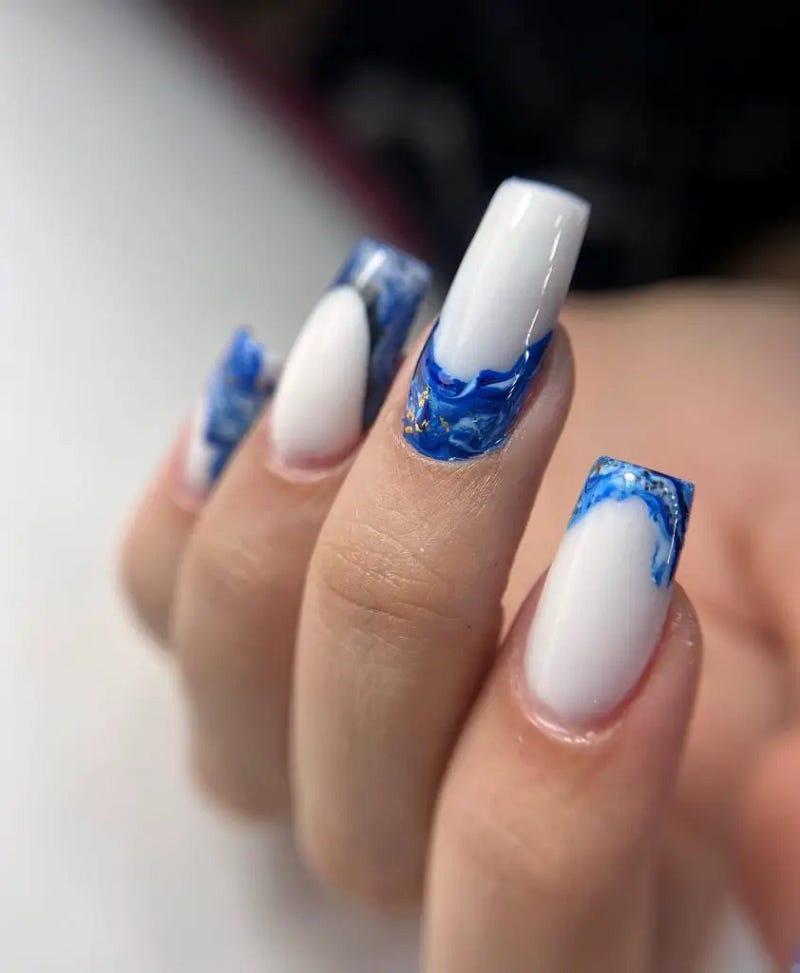
- Materials Needed:
- White nail polish as the base
- Blue nail polish for marbling
- Gold nail polish for accents
- A small brush or a toothpick for swirling
- Top coat for a smooth finish
DIY Tips:
- Paint your nails with a white base coat.
- While the base is still tacky, drop blue and gold polishes onto the nail.
- Use a toothpick to gently swirl the colors together to create a marble effect.
- Apply a top coat to enhance the design and add longevity.
Elegant Floral Overlay
This manicure features a delightful flowers pattern over a sophisticated neutral base, making it a perfect choice for anyone looking for something both pretty and simple. The design cleverly uses space by focusing the floral pattern on a blue background on alternating fingers, enhancing the designs color combos and giving it a modern twist suitable for any summer occasion.
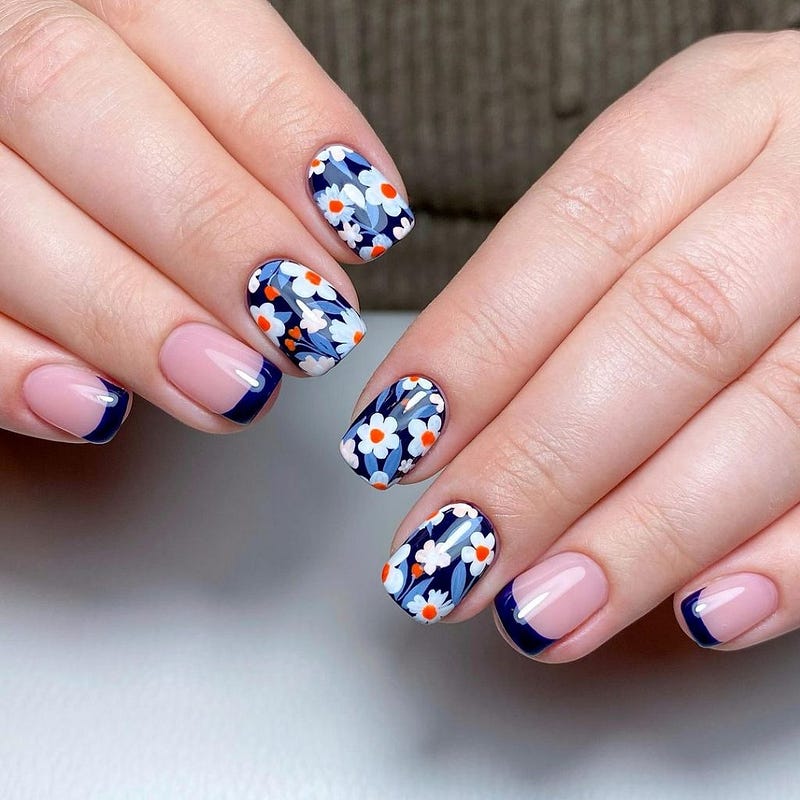
- Consumables:
- Base Coat: OPI Natural Base Coat
- Neutral Polish: Essie “Tuck It In My Tux”
- Blue Polish: China Glaze “Bermuda Breakaway”
- White and Orange Floral Accents: Acrylic Paints
- Top Coat: Sally Hansen Insta-Dri Anti-Chip
Creating this look:
- Prep your nails with the base coat to ensure a smooth application.
- Apply two coats of the neutral polish as the base on all nails.
- On alternating nails, add a blue background at the tip, fading into the neutral base.
- Use a thin brush to hand-paint white and orange flowers over the blue.
- Seal everything with a top coat to protect your design and add a glossy finish.
Vibrant Neon Green With Artistic Flair
This bold and bright neon green manicure screams summer fun and is sure to be a head-turner at any event. Enhanced with delicate water droplet effects and a tiny designs art ideas accent of yellow flowers, this look combines the energetic vibe of green with cute and clean artistry, making it a standout designs simple yet striking choice.
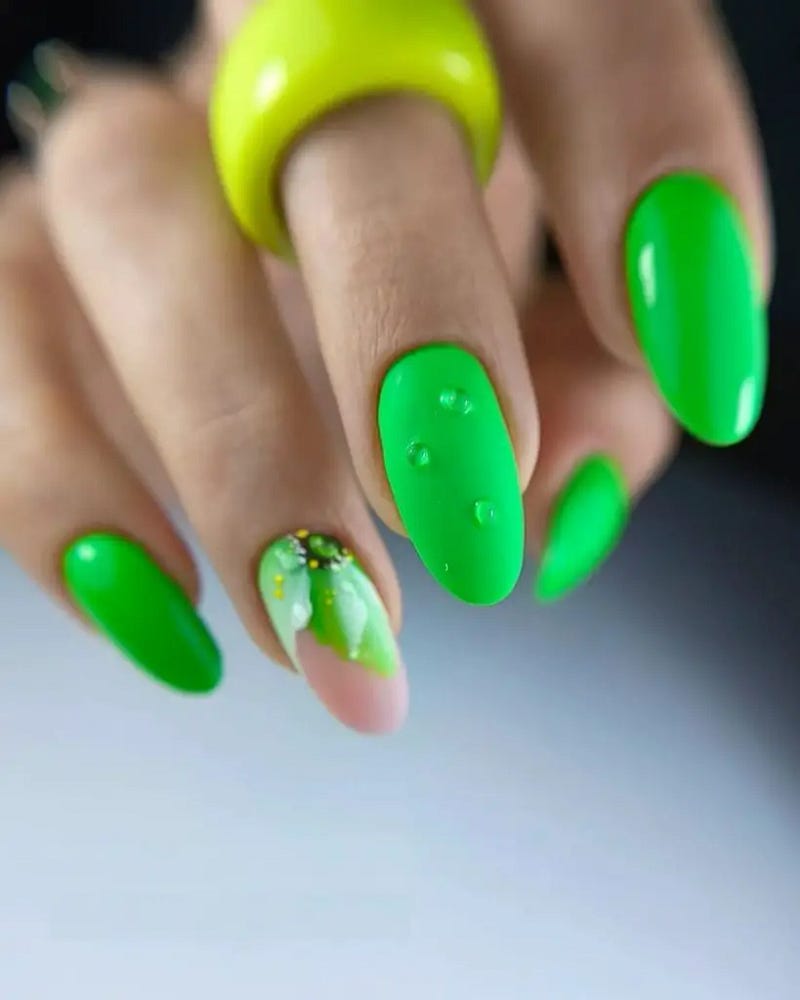
- Consumables:
- Base Coat: Revlon Quick Dry Base Coat
- Neon Green Polish: Orly “Glowstick”
- Yellow for Flowers: Sally Hansen “Mellow Yellow”
- Glossy Top Coat: Seche Vite Dry Fast Top Coat
Creating this look:
- Start by applying the base coat to clean, dry nails.
- Once dry, apply two coats of the neon green polish for a vibrant base.
- For the water droplets, use a small dotting tool to place tiny blobs of clear polish randomly across the nail.
- Add small yellow flowers by dotting the yellow polish and drawing tiny petals.
- Finish with a glossy top coat to enhance the vibrancy and ensure durability.
Refreshing Orange Splash
This nail design is a vibrant celebration of summer, featuring a bold orange hue paired with a playful floral pattern on a transparent base. It’s a perfect embodiment of classy summer nails Shades & designs, combining fun with chic elegance.
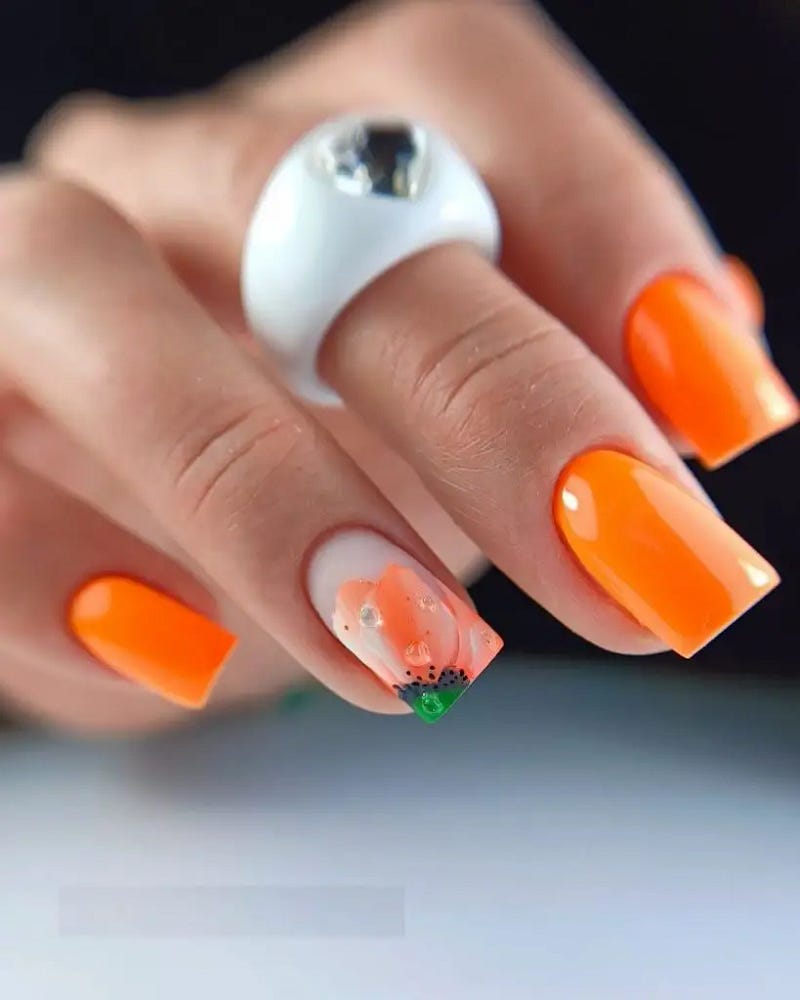
- Consumables:
- Base Coat: CND Essential Base Coat
- Orange Polish: Essie “Meet Me At Sunset”
- Clear Polish for Floral Base: OPI “Don’t Burst My Bubble”
- Black and Green Polish for Details: Tiny brushes for petal and leaf details
- Top Coat: Revlon Quick Dry Top Coat
Creating this look:
- Apply a base coat to protect your nails.
- Paint all except the ring finger with two coats of vivid orange.
- For the ring finger, use clear polish as a base.
- Carefully paint a floral design using black for outlines and green for leaves.
- Once dry, apply a top coat to all nails for a shiny, enduring finish.
Subtle Sunrise Gradient
This design captures the soft gradients of a sunrise using ombre techniques that blend yellow and pink into a seamless transition. The result is an effortlessly chic and simple french tip design that’s both trendy and pretty.

- Consumables:
- Base Coat: Sally Hansen Double Duty
- Pink Polish: OPI “Charged Up Cherry”
- Yellow Polish: China Glaze “Lemon Fizz”
- Sponge for Gradient: Makeup sponge for dabbing
- Top Coat: Essie Gel Setter Top Coat
Creating this look:
- Start with a thorough base coat to ensure even color application.
- Apply pink polish as the base color.
- Dab yellow polish on the tip using a sponge to create the gradient effect.
- Blend the colors slightly where they meet to ensure a smooth transition.
- Finish with a gel top coat for a glossy, long-lasting manicure.
Swirled Pastel Perfection
The soft swirls of white and pink create a delicate marbled effect, making this design perfect for those who prefer simple, clean, and elegant nails. Added silver accents provide a hint of sparkle, enhancing the designs glitter element subtly.

- Consumables:
- Base Coat: OPI Bond Aid
- White Polish: Essie “Blanc”
- Pink Swirl Polish: Revlon “Pink Nude”
- Silver Line Polish: Sally Hansen “Sterling Silver”
- Top Coat: OPI Top Coat
Creating this look:
- Apply the base coat for smooth polish application.
- Paint a base of soft white.
- Add pink swirls gently with a fine brush.
- Use a very thin brush to add delicate silver lines through the pink swirls.
- Seal with a top coat for a glossy, durable finish.
Bold Blue Statement
This stunning blue nail design is as chic as it is eye-catching. Perfect for both daytime and evening wear, the rich blue hue is a great choice for those looking to make a simple yet bold statement.

- Consumables:
- Base Coat: China Glaze Strong Adhesion Base Coat
- Blue Polish: Essie “Butler Please”
- Top Coat: Butter London Hardwear UV Shine Top Coat
Creating this look:
- Begin with a base coat to protect your nails.
- Apply two coats of the vibrant blue polish for a deep, even color.
- Finish with a UV shine top coat for a lasting glossy look.
Soft Pink Elegance
Embodying a timeless charm, this simple pink manicure uses a subtle pink shade to create a look that’s both pretty and clean. It’s perfect for any summer outfit, blending seamlessly with both casual and more formal attire.
- Consumables:
- Base Coat: Orly Rubberized Base
- Pink Polish: Essie “Muchi, Muchi”
- Top Coat: Seche Vite Dry Fast Top Coat
Creating this look:
- Apply a rubberized base coat for extra adherence.
- Coat the nails with two layers of soft pink.
- Complete the manicure with a fast-drying top coat for a sleek finish.
Delicate Floral French Tips
This elegant nail design adds a whimsical touch to the classic French tip by incorporating tiny flowers at the edge. It’s perfect for a classy summer nails Shades & designs look that balances simplicity with a splash of floral fun.
- Consumables:
- Base Coat: OPI Natural Nail Base Coat
- Nude Polish: Essie “Ballet Slippers”
- White Tip Polish: Sally Hansen “White On”
- Floral Stickers or Hand-painted using fine brush
- Top Coat: Glisten & Glow Top Coat
Creating this look:
- Apply the base coat to protect the nails.
- Paint the nails with a nude polish for a clean and subtle background.
- Carefully create the white tips using a fine brush or tip guides.
- Add floral details on the tips, either with stickers or by hand-painting.
- Finish with a top coat to seal in the design and enhance durability.
Pink Shimmer With Crystal Accents
Here we see a lustrous pink base enriched with tiny crystal embellishments. This design is ideal for those seeking a simple yet chic look that combines classic elegance with a hint of sparkle.

- Consumables:
- Base Coat: Revlon Quick Dry Base Coat
- Pink Shimmer Polish: Essie “Princess Charming”
- Small Crystals: Swarovski Tiny Gems
- Adhesive for Crystals: Nail Glue
- Top Coat: China Glaze Fast Forward Top Coat
Creating this look:
- Start with a base coat to ensure a smooth application.
- Apply two coats of pink shimmer polish for a full, opaque look.
- Place crystals on the nail while the second coat is still tacky.
- Use a tiny dot of nail glue for each crystal to ensure they adhere well.
- Apply a top coat to protect the polish and secure the crystals.
Classic Bold Red
The quintessential red manicure makes a bold statement, perfect for any season but especially striking in the summer. This design is all about confidence, with a glossy finish that grabs attention.

- Consumables:
- Base Coat: Butter London Nail Foundation
- Red Polish: OPI “Big Apple Red”
- Top Coat: Seche Vite Dry Fast Top Coat
Creating this look:
- Apply a base coat to protect and smooth the nail surface.
- Paint two coats of vibrant red polish for a deep, rich color.
- Finish with a high-gloss top coat to bring out the true beauty of the red.
Cherry Blossoms On White French Tips
This nail design captures the essence of spring transitioning into summer with its cherry blossom accents on classic French tips. It’s a delightful blend of traditional and playful, perfect for both casual and formal summer settings.

- Consumables:
- Base Coat: OPI Natural Nail Base Coat
- White Polish: Sally Hansen “White Out”
- Pink for Blossoms: Tiny brushes for detailed painting
- Green for Stems: Acrylic paint
- Top Coat: OPI Top Coat
Creating this look:
- Prepare the nails with a base coat.
- Apply a white polish for the tips, creating a clean line.
- Hand-paint cherry blossoms and stems on the tips.
- Finish with a top coat to protect and enhance the artwork.
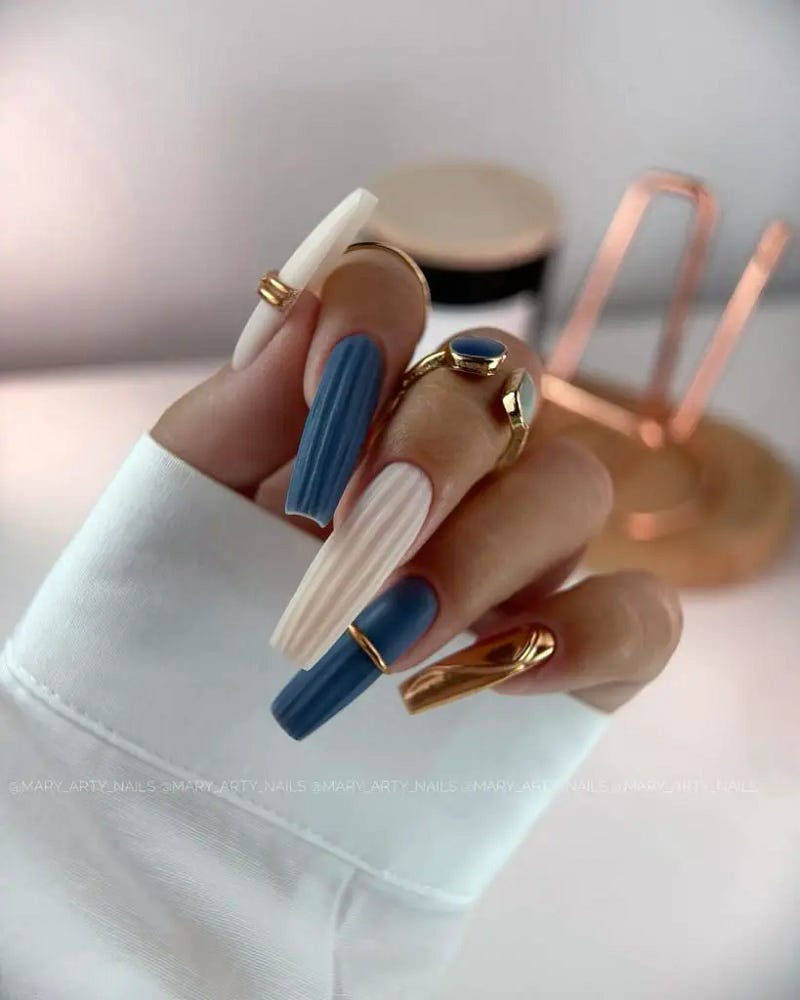
Modern Art On Nails
This innovative design showcases a sophisticated blend of blue and neutral tones, accented with geometric patterns and varied textures. It’s a trendy choice for those who admire art on their nails, offering a fresh take on nail aesthetics.
- Consumables:
- Base Coat: Essie Here to Stay Base Coat
- Neutral Polish: Zoya “Dove”
- Blue Polish: Essie “Butler Please”
- Matte Top Coat for Texture: Matte Finish Top Coat
- Detailing Tools: Striping tape and fine brushes
Creating this look:
- Start with a base coat to protect the nails.
- Apply the neutral polish as the base color.
- Use striping tape to create geometric patterns.
- Fill in sections with blue polish for contrast.
- Apply a matte top coat on specific areas to create a varied texture effect.
- Finish with a glossy top coat on the rest for a dual-texture look.
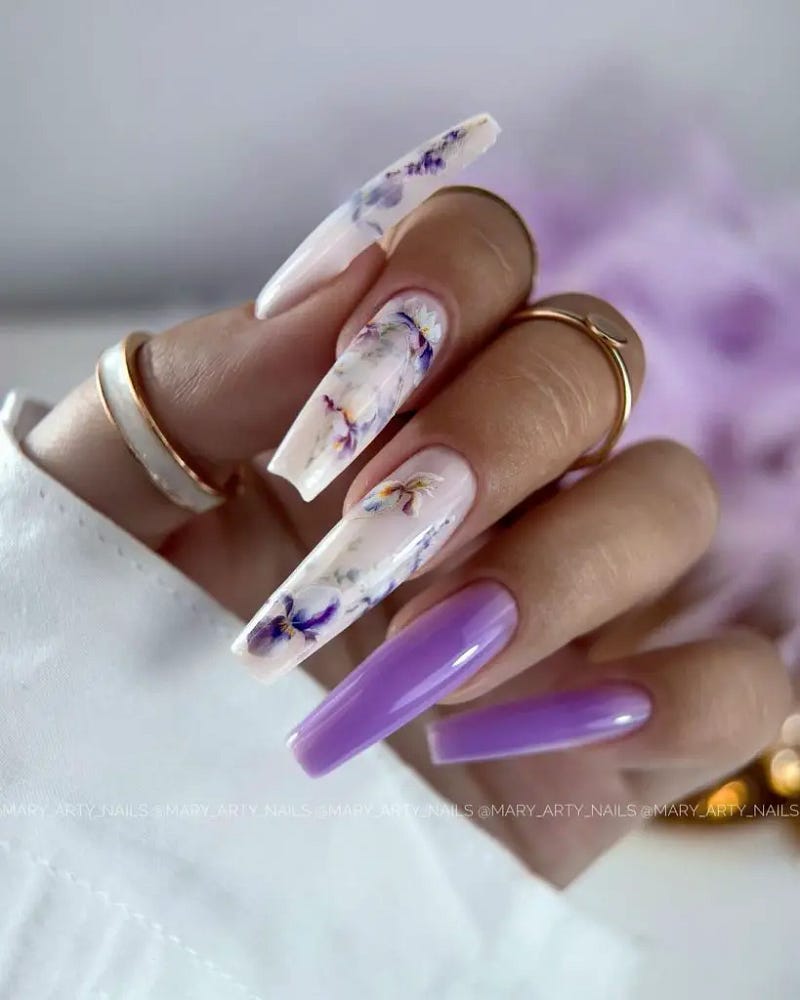
Ethereal Floral Elegance
This nail art showcases an ethereal blend of subtle floral patterns encapsulated in a clear acrylic. The elongated nail shape is perfect for displaying the intricate details of each petal, while the purple accents provide a soft color pop appropriate for any summer event.
- Consumables:
- Base Coat: Essie All in One Base
- Clear Acrylic: Polygel for encapsulation
- Purple Polish: OPI “Do You Lilac It?”
- Floral Decals: Handmade or purchased
- Top Coat: INM Out the Door Top Coat
Creating this look:
- Apply the base coat to prime the nails.
- Sculpt the nails with clear acrylic, forming the desired shape and length.
- Before curing, place floral decals into the acrylic.
- Add subtle strokes of purple polish to enhance the floral theme.
- Seal with a top coat for a glass-like finish and to protect the design.
Whimsical Blue Butterflies
This playful design features crisp white nails adorned with delicate blue butterfly decals, perfect for adding a whimsical touch to your summer style. The butterflies seem to flutter across a pristine background, making this look ideal for sunny days and casual outings.
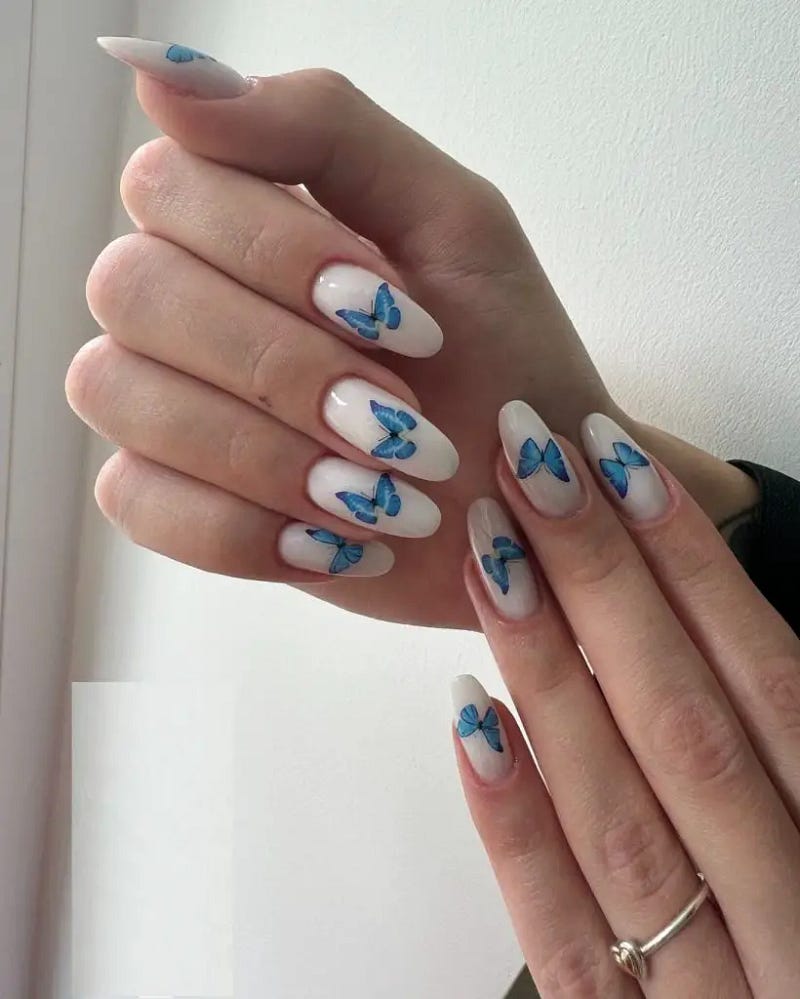
- Consumables:
- Base Coat: CND Sticky Base
- White Polish: Essie “Blanc”
- Butterfly Decals: Pre-made stickers or hand-painted
- Top Coat: OPI Rapidry Top Coat
Creating this look:
- Start with a sticky base coat to ensure the polish adheres well.
- Apply two coats of white polish for a solid background.
- Carefully place butterfly decals on the nails, or hand-paint them using fine brushes.
- Finish with a quick-dry top coat to protect the decals and enhance longevity.
Lavender Luxury
Summer beckons for colors that not only pop but also soothe, and this lavender hue paired with intricate glitter accents does just that. The nails alternate between solid lavender, glitter-dipped tips, and a dramatic crystalline accent on the ring finger. This design speaks volumes about the classy summer nails shades & designs, combining purple’s calm with sparkling glitter’s excitement.
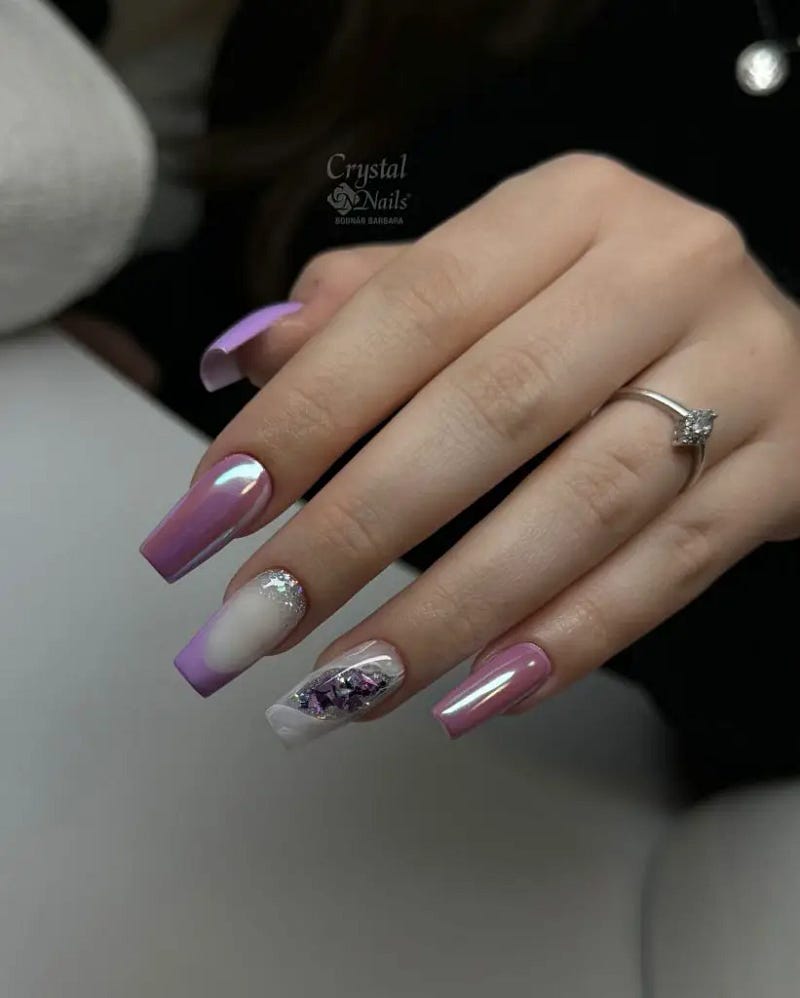
- Materials Needed:
- Lavender nail polish
- Clear polish
- Silver glitter
- Rhinestones and crystal embellishments
- Nail glue
DIY Tips:
- Apply two coats of lavender polish on all fingers except the ring finger.
- For the ring finger, use a clear polish as the base.
- Dip the tips of the other fingers in silver glitter.
- Adhere rhinestones and crystals on the ring finger using nail glue.
- Seal all nails with a top coat to add gloss and protect the design.
Pink Leopard Print
Nothing screams summer fun like a playful leopard print. These nails use a vibrant pink base with black and green leopard spots, perfect for those who love a bit of edge in their style. This choice is fabulous for anyone looking to combine cute and chic in their summer look.
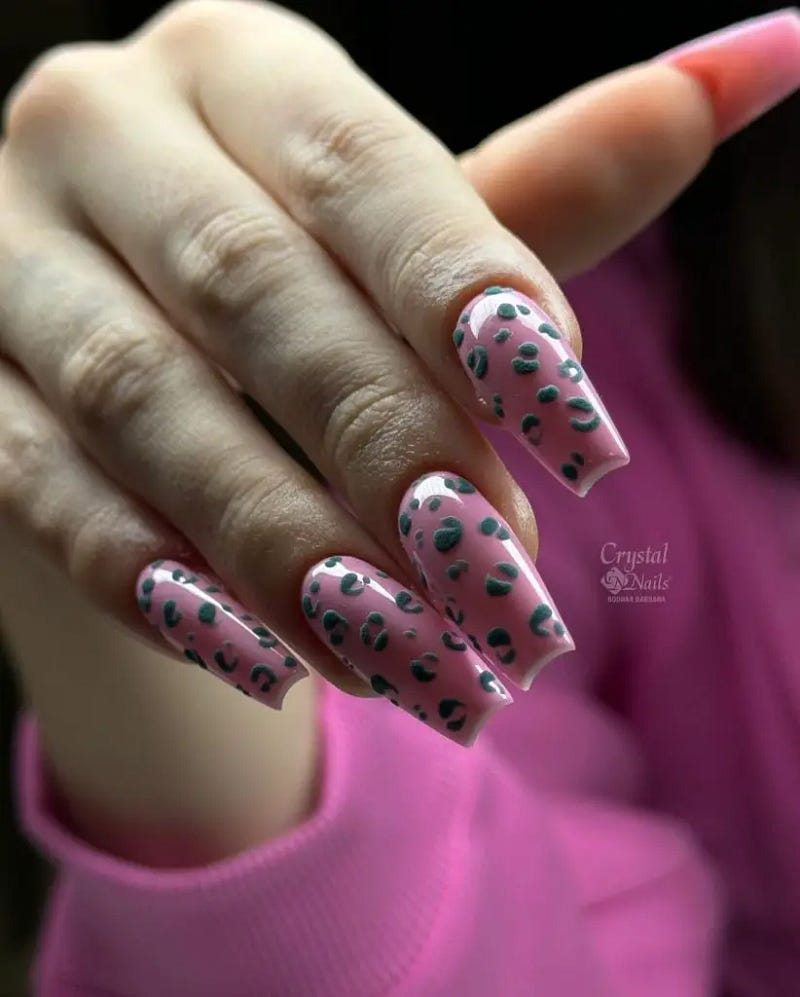
- Materials Needed:
- Pink nail polish
- Black and green nail polish for the spots
- A thin brush or a dotting tool
- DIY Tips:
- Paint your nails with the pink polish as the base color.
- Use the thin brush to create leopard spots in black.
- Add a small dot of green in the center of each black spot.
- Finish with a clear top coat for a lasting finish.


No comments:
Post a Comment