Discover the beauty of fall nails glitter, featuring trendy designs at affordable prices. Choose from square or almond shapes with sparkling accents and ombre patterns. Embrace the season with dark brown, orange, and black colors, or add a touch of elegance with red and burgundy hues. Perfect for any occasion, these nails offer shiny tips and cute ideas, making them ideal for weddings, proms, and everyday wear in 2024.
Pink And White Lace
This cute design combines a pink glitter base with intricate white lace patterns. The short, square nails are perfect for showcasing the delicate details of the lace, making this design both feminine and trendy. The subtle glitter adds a touch of sparkle, perfect for a romantic fall look.
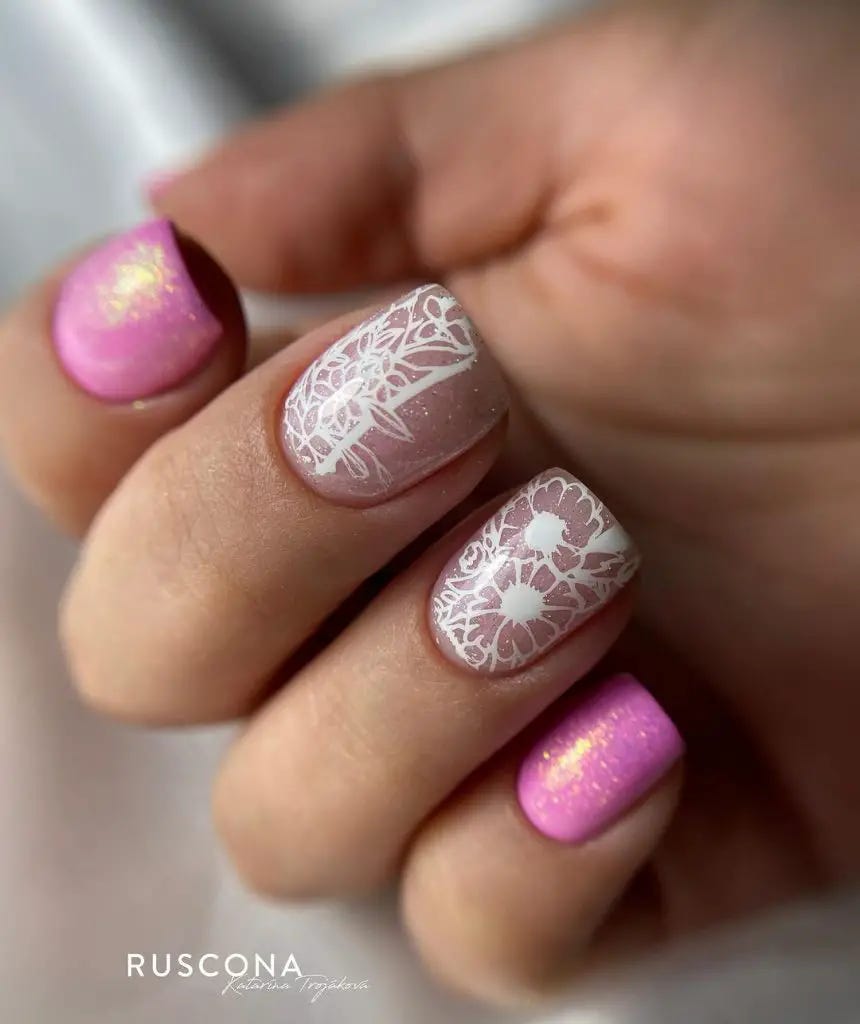
Consumables:
- Pink Glitter Polish: China Glaze Nail Lacquer in “Diva Bride”.
- White Nail Art Pen: Sally Hansen Nail Art Pen in White.
- Base Coat: Orly Bonder Base Coat.
- Top Coat: Seche Vite Dry Fast Top Nail Coat.
DIY Tips:
- Apply the base coat and let it dry.
- Paint your nails with the pink glitter polish.
- Once dry, use the white nail art pen to draw delicate lace patterns.
- Seal with a top coat to protect your design and add shine.
Neutral Glitter Elegance
This design features a neutral, glittery base that’s perfect for any occasion. The soft, rounded nails add a touch of elegance, while the subtle glitter provides a hint of sparkle. This simple yet sophisticated look is ideal for those who prefer understated nail designs.
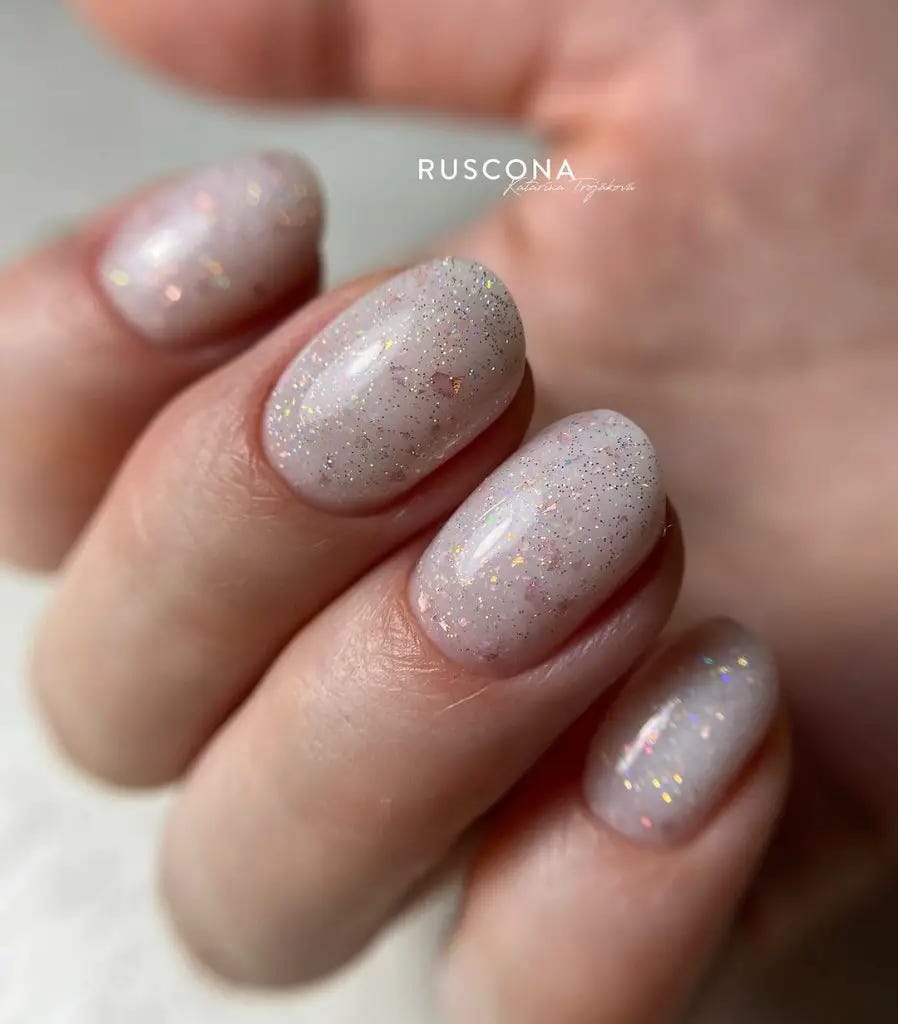
Consumables:
- Neutral Glitter Polish: Essie Nail Polish in “Imported Bubbly”.
- Base Coat: Deborah Lippmann Hard Rock Base and Top Coat.
- Top Coat: CND Vinylux Weekly Top Coat.
DIY Tips:
- Start with a base coat to protect your nails.
- Apply two coats of the neutral glitter polish, letting each coat dry thoroughly.
- Finish with a top coat to seal in the glitter and enhance the shine.
Purple And Pink French Tips
This fun and trendy design features purple French tips with a pink glitter accent. The short, square nails are perfect for showcasing the vibrant colors, making this look ideal for those who love playful nail designs. The glitter accent adds a touch of sparkle to the bold French tips.
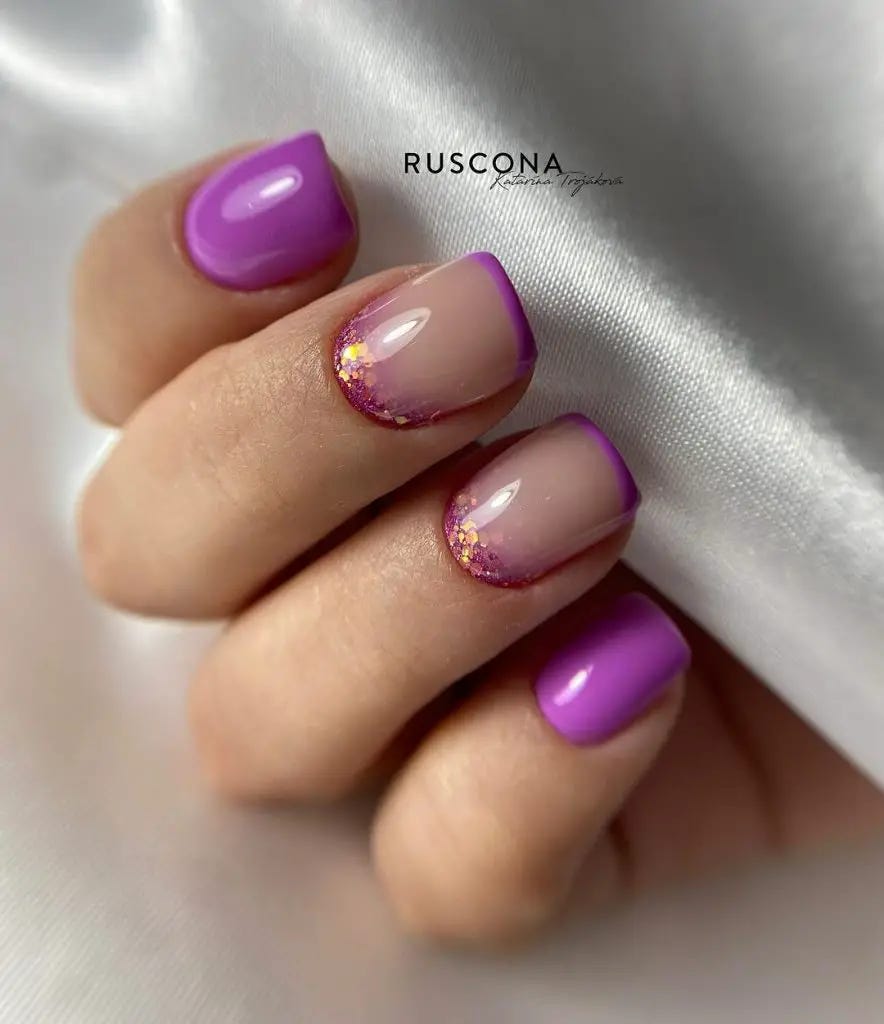
Consumables:
- Purple Nail Polish: Zoya Nail Polish in “Caitlin”.
- Pink Glitter Polish: OPI Nail Lacquer in “Princesses Rule!”.
- Base Coat: Essie First Base Coat.
- Top Coat: Sally Hansen Miracle Gel Top Coat.
DIY Tips:
- Apply the base coat and let it dry.
- Paint the tips of your nails with the purple nail polish.
- Use the pink glitter polish on an accent nail or to create a gradient effect.
- Seal with a top coat to protect your design and add extra shine.
Green And Gold Gradient
This vibrant design features a green base with a gold glitter gradient, creating a dazzling effect. The long, square nails are perfect for making a bold statement, making this design ideal for festive occasions. The gradient effect adds depth and dimension, giving your nails a sparkling finish.
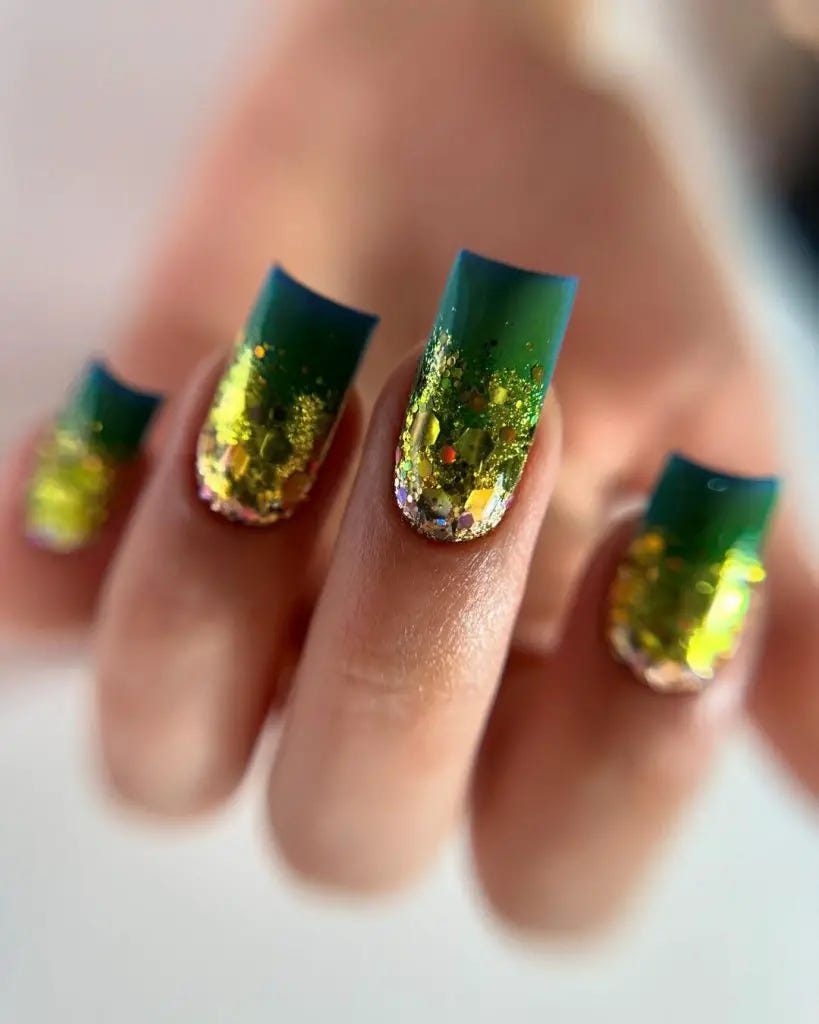
Consumables:
- Green Nail Polish: OPI Nail Lacquer in “Envy the Adventure”.
- Gold Glitter Polish: China Glaze Nail Lacquer in “Mingle with Kringle”.
- Base Coat: Orly Bonder Base Coat.
- Top Coat: Seche Vite Dry Fast Top Nail Coat.
DIY Tips:
- Apply the base coat and let it dry.
- Paint your nails with the green nail polish.
- Use a sponge to dab the gold glitter polish onto the tips, creating a gradient effect.
- Finish with a top coat to seal in the glitter and add shine.
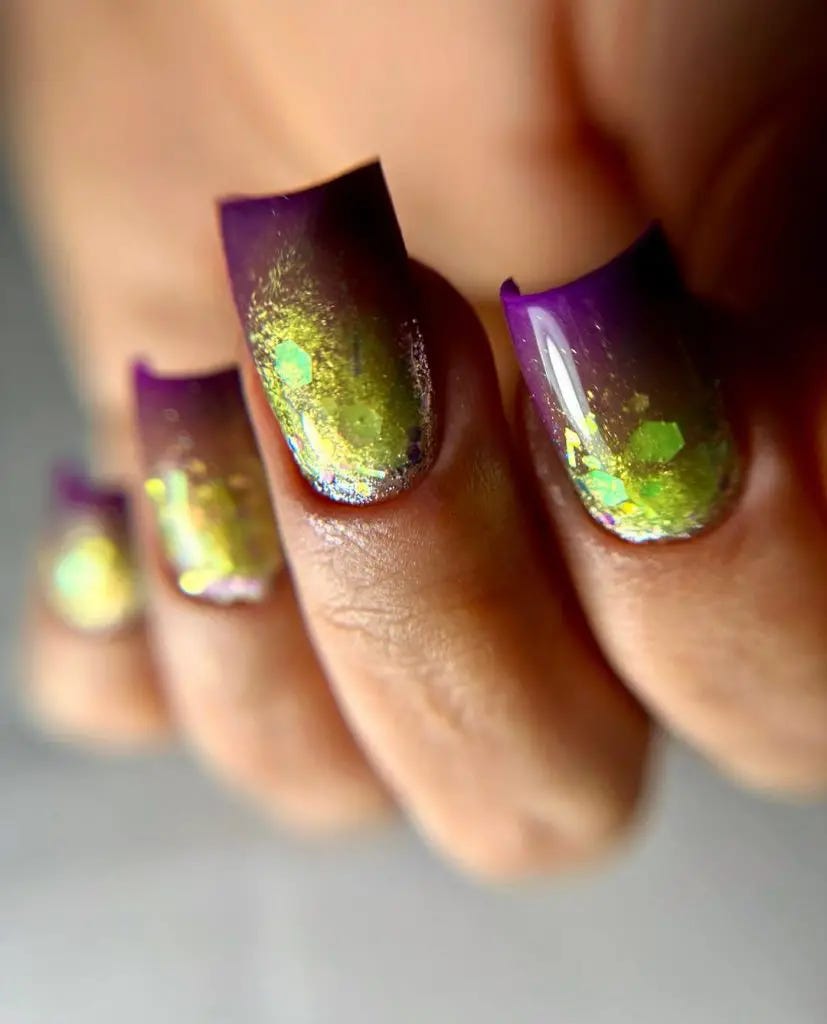
Purple And Gold Fusion
This striking design combines purple tips with gold glitter for a captivating look. The long, square nails create a dramatic canvas that beautifully showcases the rich colors. The gold glitter adds a dazzling effect, making this design perfect for evening events or a special occasion.
Consumables:
- Purple Nail Polish: Zoya Nail Polish in “Pinta”.
- Gold Glitter Polish: OPI Nail Lacquer in “Glitzerland”.
- Base Coat: Essie First Base Coat.
- Top Coat: Sally Hansen Miracle Gel Top Coat.
DIY Tips:
- Start with a clean, filed nail and apply a base coat.
- Paint the tips of your nails with the purple nail polish.
- Apply the gold glitter polish on top of the purple tips, blending it downwards for a gradient effect.
- Finish with a top coat to seal in the design and add shine.
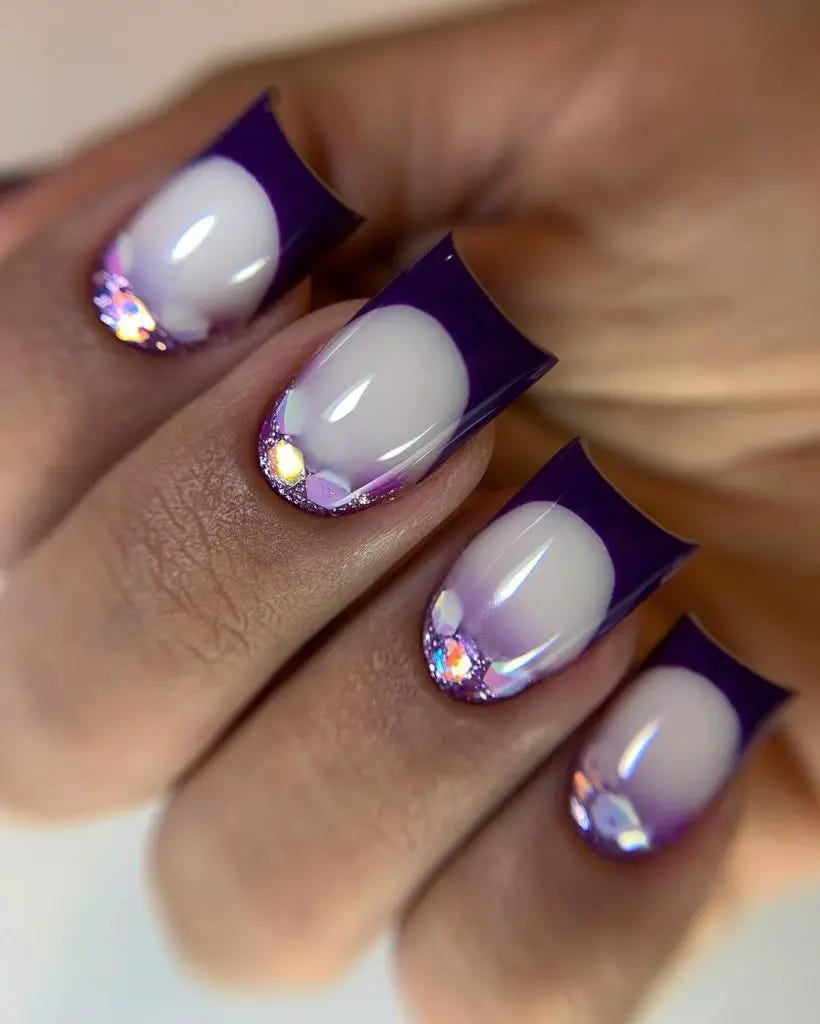
Purple French Tips With Sparkle
This elegant design features purple French tips with a touch of sparkling glitter at the base. The almond-shaped nails add a sophisticated flair, making this design perfect for both everyday wear and special occasions. The subtle glitter adds a hint of sparkle without overwhelming the look.
Consumables:
- Purple Nail Polish: Essie Nail Polish in “Sexy Divide”.
- Glitter Polish: China Glaze in “Fairy Dust”.
- Base Coat: OPI Natural Nail Base Coat.
- Top Coat: Seche Vite Dry Fast Top Nail Coat.
DIY Tips:
- Apply the base coat and let it dry.
- Paint the tips of your nails with the purple nail polish.
- Use the glitter polish to add a sparkling accent at the base of the tips.
- Seal with a top coat to protect the design and add shine.
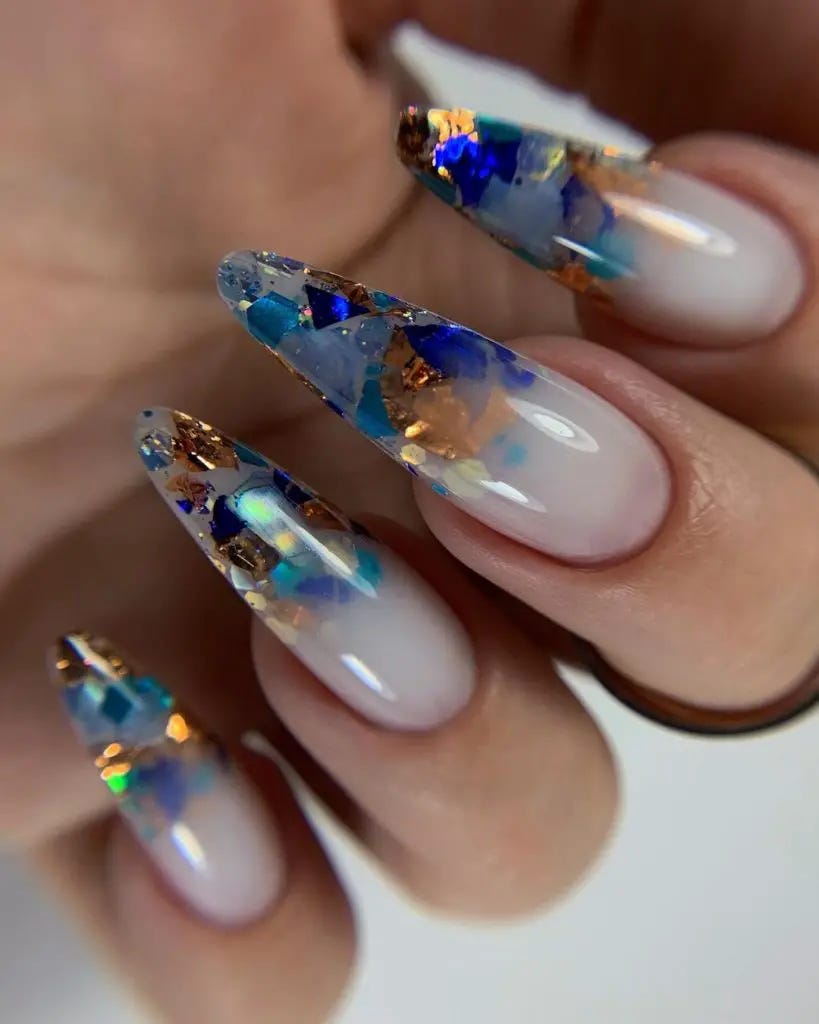
Encapsulated Blue And Gold
This unique design features encapsulated blue and gold glitter within a clear almond-shaped nail. The encapsulated glitter creates a 3D effect, giving your nails a stunning and artistic look. This design is perfect for those who love bold and creative nail art.
Consumables:
- Clear Builder Gel: Gelish Hard Gel Clear Builder Gel.
- Blue and Gold Glitter: Mia Secret Nail Art Glitter.
- Base Coat: Orly Bonder Base Coat.
- Top Coat: CND Shellac Top Coat.
DIY Tips:
- Apply the base coat and let it dry.
- Use the builder gel to create a clear base, then apply the blue and gold glitter.
- Encapsulate the glitter with another layer of builder gel.
- Finish with a top coat to seal in the design and add shine.
Pink And Silver Glam
This glamorous design combines pink polish with a sparkling silver glitter accent. The almond-shaped nails add a touch of elegance, while the glitter accent nail adds a dazzling effect. This design is perfect for adding some sparkle to your everyday look.
Consumables:
- Pink Nail Polish: Essie Nail Polish in “Mod Squad”.
- Silver Glitter Polish: Sally Hansen Xtreme Wear in “Disco Ball”.
- Base Coat: Deborah Lippmann Hard Rock Base and Top Coat.
- Top Coat: CND Vinylux Weekly Top Coat.
DIY Tips:
- Apply the base coat and let it dry.
- Paint your nails with the pink nail polish.
- Use the silver glitter polish on an accent nail or create a gradient effect.
- Seal with a top coat to protect the design and add shine.
Blue And White French With Jewels
This elegant design features blue glitter nails paired with white French tips and adorned with blue jewels. The square-shaped nails create a classic look, while the glitter and jewels add a touch of luxury. This design is perfect for formal occasions or a glamorous night out.
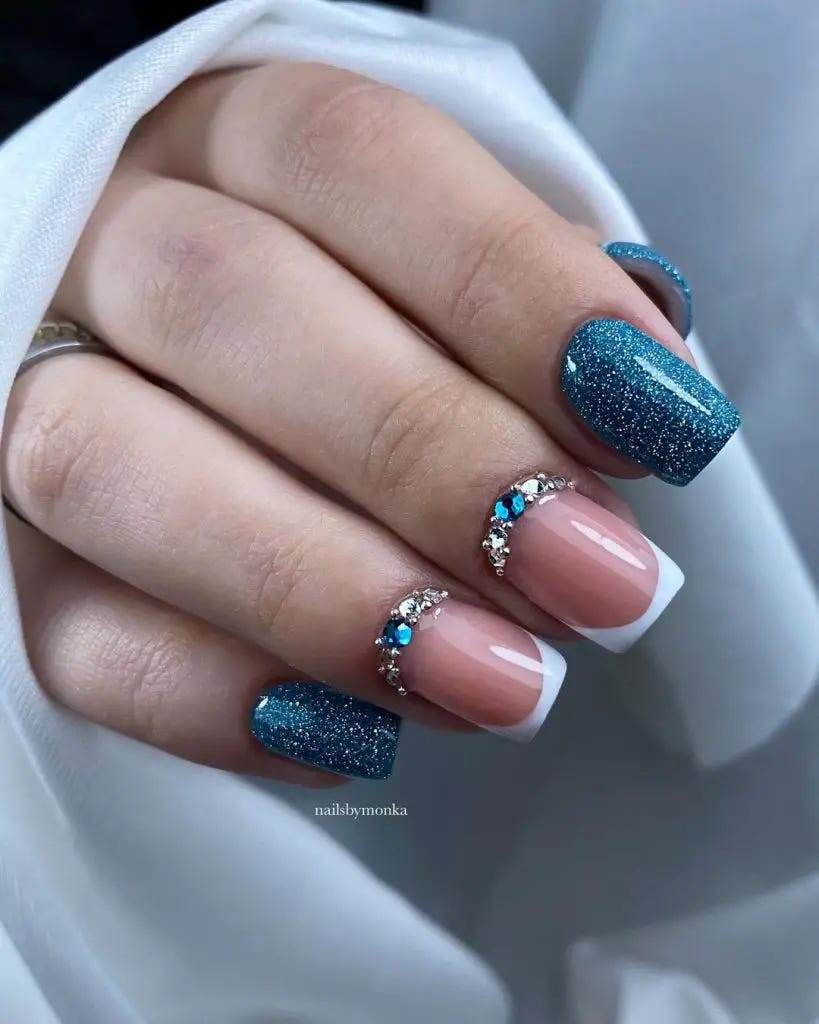
Consumables:
- Blue Glitter Polish: OPI Nail Lacquer in “DS Magic”.
- White Nail Polish: Essie Nail Polish in “Blanc”.
- Blue Jewels: Kiss Nail Art Rhinestones.
- Base Coat: Orly Bonder Base Coat.
- Top Coat: Seche Vite Dry Fast Top Nail Coat.
DIY Tips:
- Apply the base coat and let it dry.
- Paint your nails with the blue glitter polish.
- Create white French tips on a few nails and adorn them with blue jewels.
- Finish with a top coat to seal in the design and add extra shine.
Red And Rhinestone Glam
This luxurious design features a bold red base with glitter and an eye-catching rhinestone accent. The almond-shaped nails create a sophisticated look that is perfect for festive occasions. The combination of red and sparkling rhinestones makes this design both elegant and glamorous.
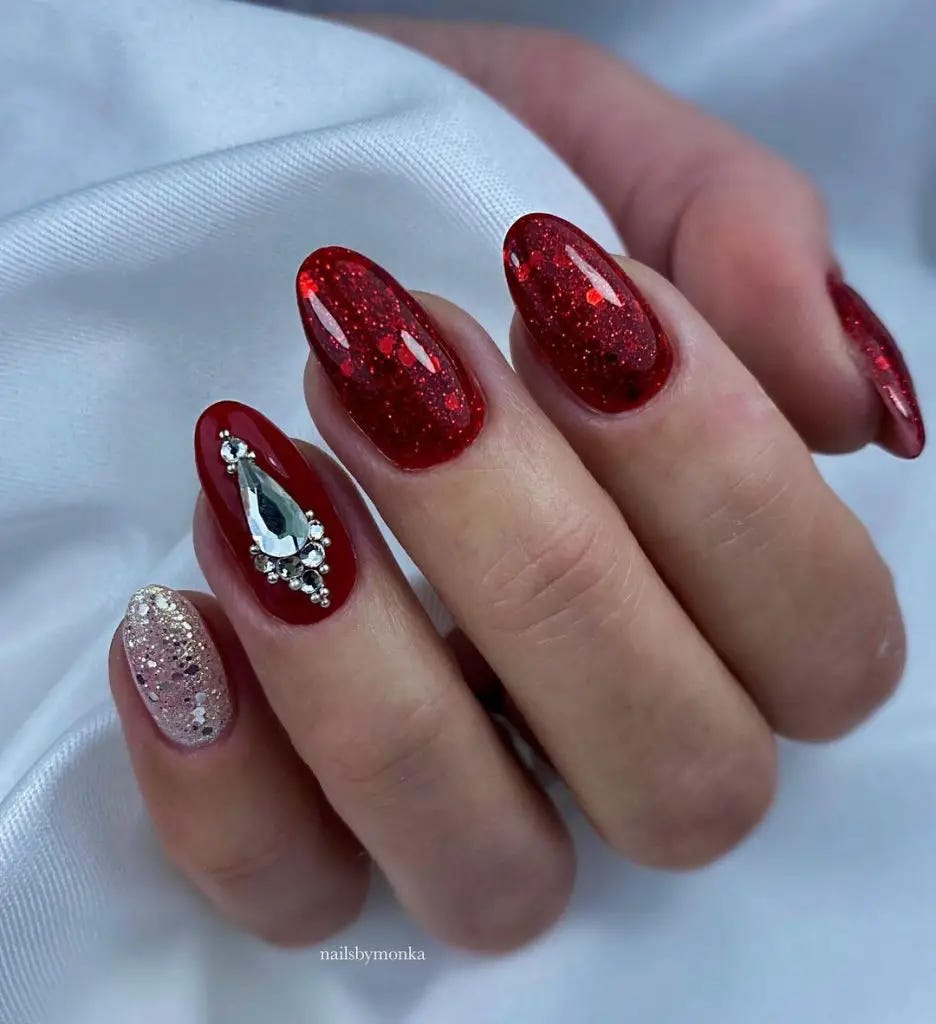
Consumables:
- Red Nail Polish: OPI Nail Lacquer in “Big Apple Red”.
- Red Glitter Polish: China Glaze Nail Lacquer in “Ruby Pumps”.
- Rhinestones: Kiss Nail Art Rhinestones.
- Base Coat: Essie First Base Coat.
- Top Coat: Sally Hansen Miracle Gel Top Coat.
DIY Tips:
- Apply the base coat and let it dry.
- Paint your nails with two coats of the red nail polish.
- Add a layer of red glitter polish for extra sparkle.
- Apply rhinestones to one accent nail using nail glue.
- Seal the design with a top coat to protect the rhinestones and add shine.
Green And Gold Shimmer
This chic design combines green nails with a stunning gold shimmer accent. The short, square nails provide a clean and modern look, while the gold shimmer adds a touch of elegance. This design is perfect for those who love a sophisticated yet understated nail style.
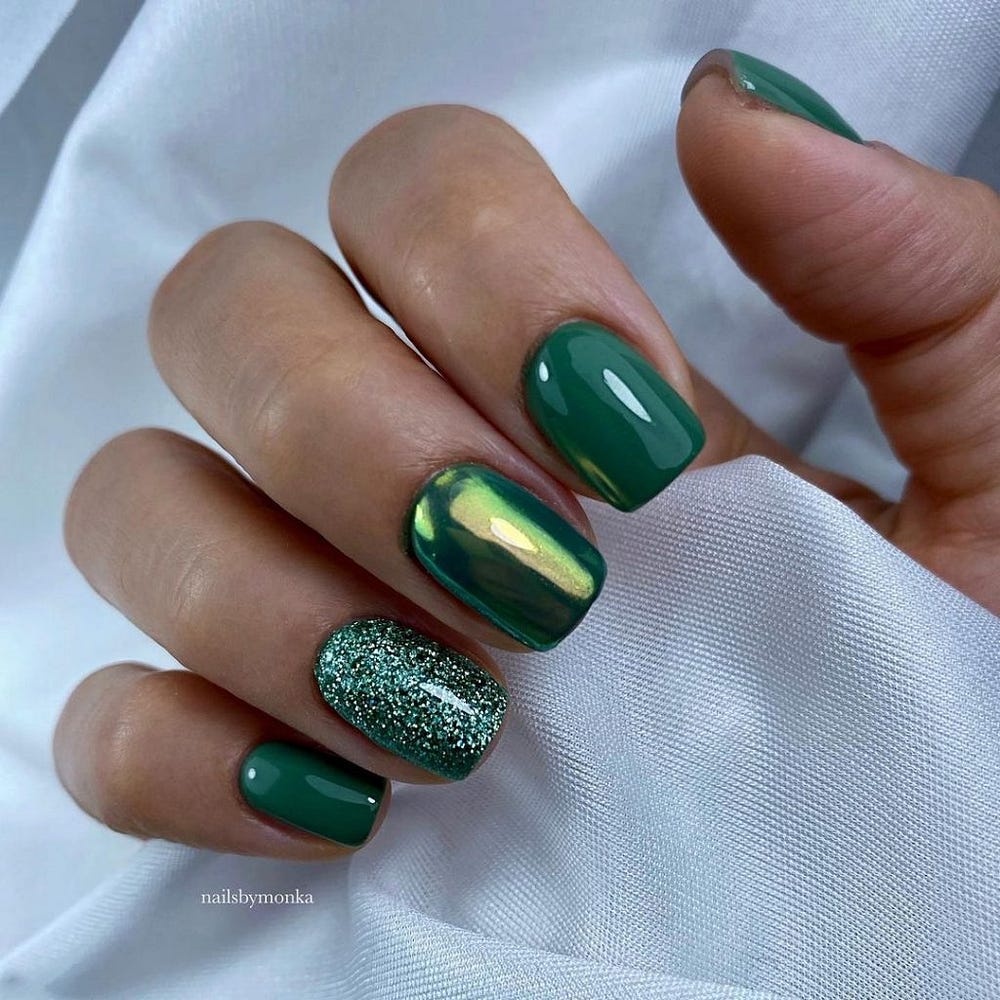
Consumables:
- Green Nail Polish: Essie Nail Polish in “Off Tropic”.
- Gold Shimmer Polish: Zoya Nail Polish in “Astrid”.
- Base Coat: CND Stickey Base Coat.
- Top Coat: Seche Vite Dry Fast Top Nail Coat.
DIY Tips:
- Start with a base coat to protect your nails.
- Apply two coats of the green nail polish, allowing each coat to dry thoroughly.
- Use the gold shimmer polish as an accent on one or two nails.
- Finish with a top coat to seal in the shimmer and add shine.
Soft Pink Shimmer
This elegant design features a soft pink shimmer that is perfect for any occasion. The short, square nails provide a neat and clean look, while the shimmer adds a subtle touch of sparkle. This design is ideal for those who prefer a more natural and understated nail style.

Consumables:
- Pink Shimmer Polish: OPI Nail Lacquer in “Princesses Rule!”.
- Base Coat: Essie First Base Coat.
- Top Coat: Sally Hansen Miracle Gel Top Coat.
DIY Tips:
- Apply the base coat and let it dry.
- Paint your nails with two coats of the pink shimmer polish.
- Seal with a top coat to enhance the shine and protect the color.
Orange And White French Tips
This fun and trendy design features orange nails with white French tips and a glitter accent. The long, square nails create a bold and modern look that is perfect for making a statement. The combination of orange and white with glitter adds a playful touch to the design.
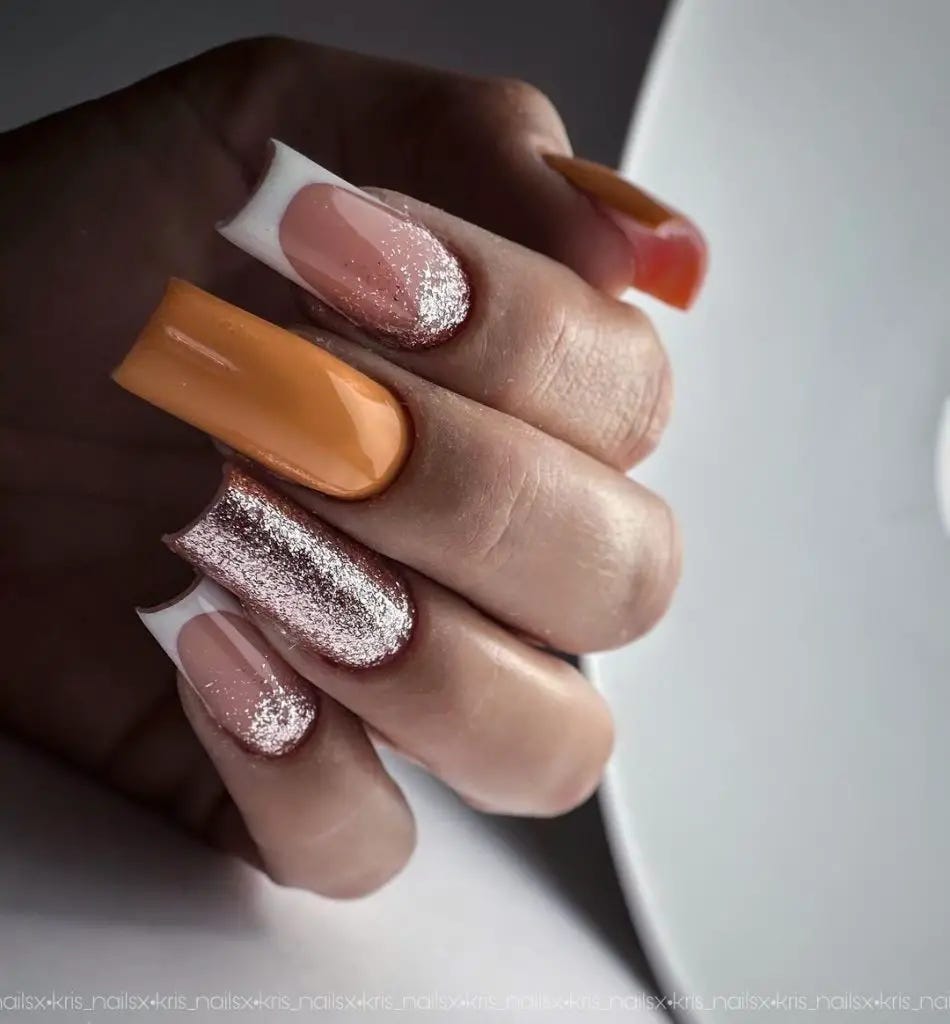
Consumables:
- Orange Nail Polish: Essie Nail Polish in “Tart Deco”.
- White Nail Polish: OPI Nail Lacquer in “Alpine Snow”.
- Silver Glitter Polish: China Glaze Nail Lacquer in “Glistening Snow”.
- Base Coat: Orly Bonder Base Coat.
- Top Coat: Seche Vite Dry Fast Top Nail Coat.
DIY Tips:
- Apply the base coat and let it dry.
- Paint your nails with the orange nail polish.
- Use the white nail polish to create French tips on each nail.
- Apply the silver glitter polish to one accent nail for added sparkle.
- Finish with a top coat to seal in the design and add shine.
Colorful Confetti
This playful design features a neutral base with colorful confetti glitter. The almond-shaped nails create a fun and festive look that is perfect for celebrations. The combination of neutral and vibrant colors makes this design both trendy and versatile.
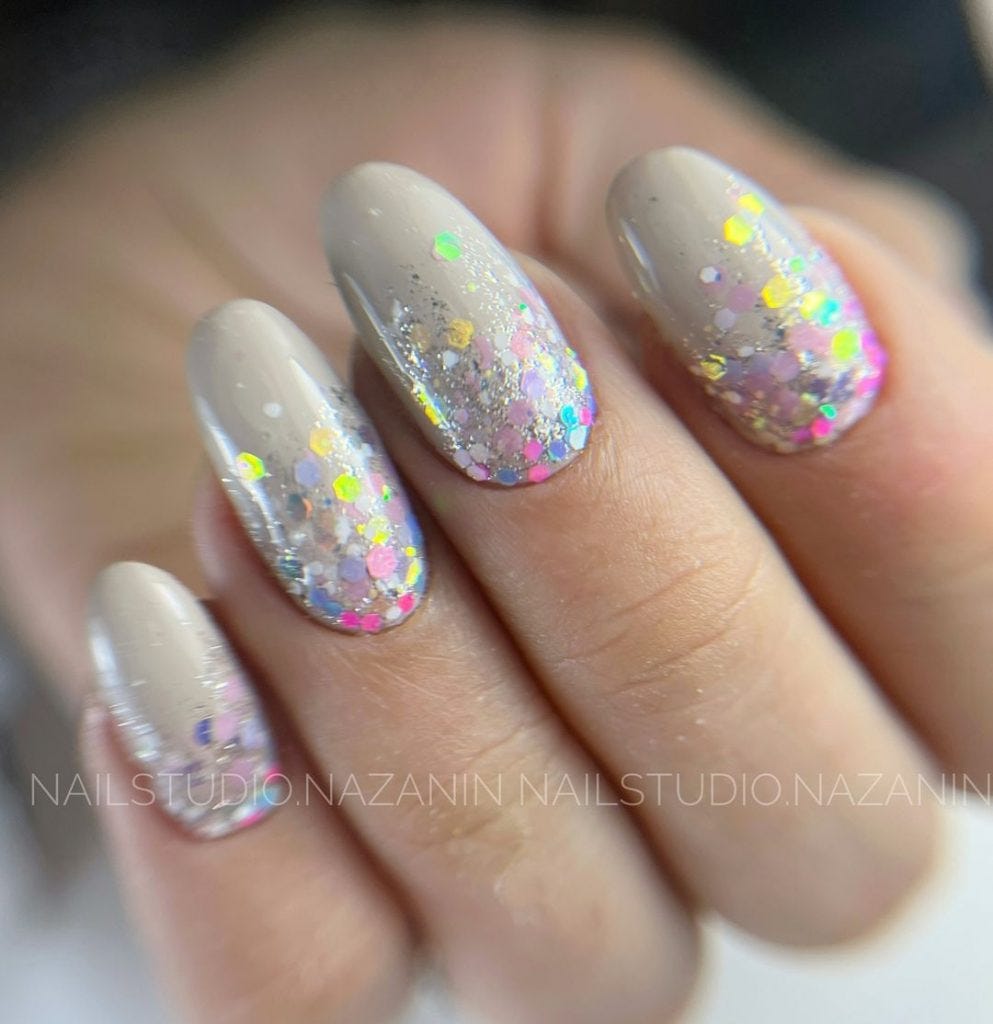
Consumables:
- Neutral Nail Polish: Essie Nail Polish in “Ballet Slippers”.
- Confetti Glitter Polish: Sally Hansen Xtreme Wear in “Strobe Light”.
- Base Coat: CND Stickey Base Coat.
- Top Coat: Essie Gel Couture Top Coat.
DIY Tips:
- Apply the base coat and let it dry.
- Paint your nails with the neutral nail polish.
- Add a layer of confetti glitter polish for a fun and colorful effect.
- Seal with a top coat to protect the glitter and add shine.
Turquoise And Silver Sparkle
This vibrant design features a turquoise base with a silver glitter accent on one nail. The short, square nails create a modern and fresh look, perfect for adding a pop of color to your fall wardrobe. The silver glitter adds a touch of sparkle, making this design both fun and chic.
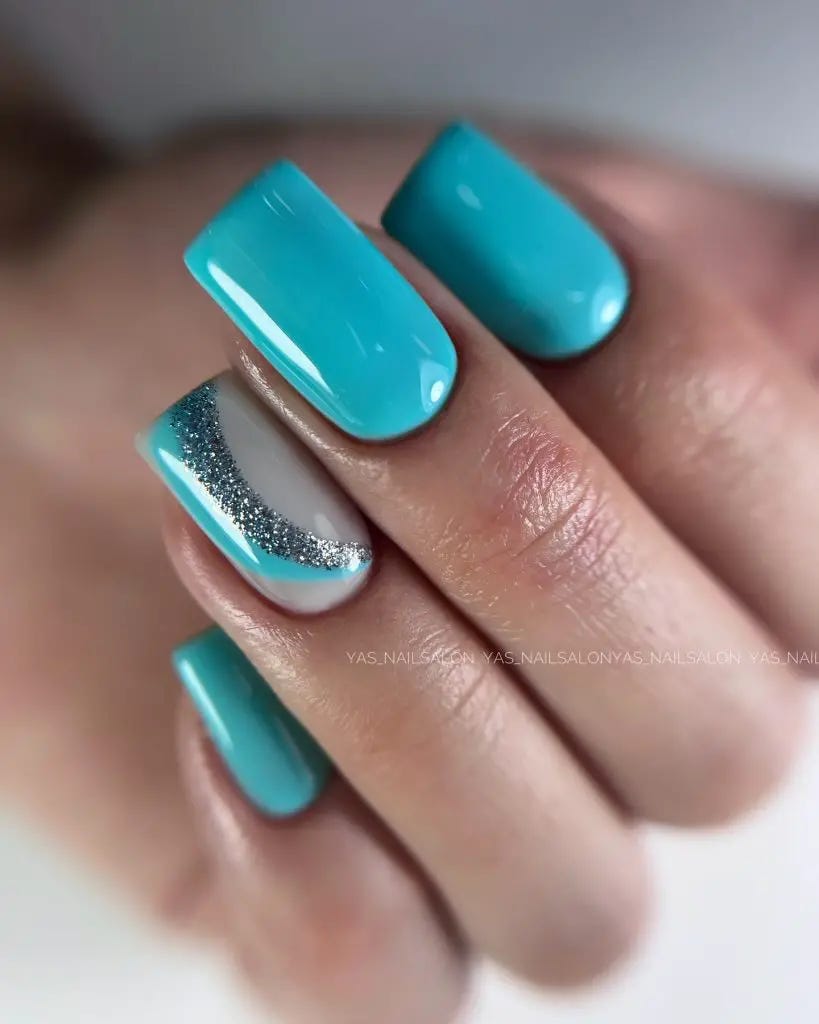
Consumables:
- Turquoise Nail Polish: OPI Nail Lacquer in “Can’t Find My Czechbook”.
- Silver Glitter Polish: China Glaze Nail Lacquer in “Silver Lining”.
- Base Coat: Essie First Base Coat.
- Top Coat: Sally Hansen Miracle Gel Top Coat.
DIY Tips:
- Apply the base coat and let it dry.
- Paint your nails with two coats of the turquoise nail polish.
- Use the silver glitter polish on one accent nail or to create a French tip.
- Finish with a top coat to seal in the design and add shine.


No comments:
Post a Comment