Summer is the ideal season to play with bold and bright nail designs, and nothing captures the essence of summer like vibrant orange hues. From neon and coral to burnt orange, there’s a perfect shade and style for everyone. In this article, we’ll explore the hottest summer orange nail design ideas, complete with detailed descriptions, a list of materials, and step-by-step instructions to achieve these stunning looks at home. Let’s dive into the world of trendy summer nails!
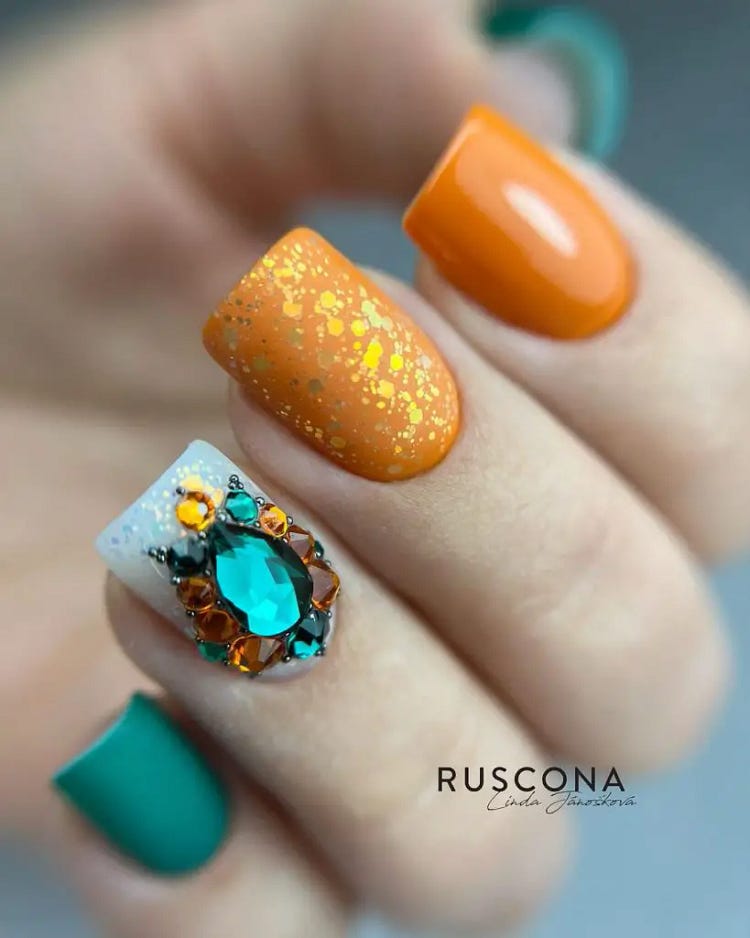
Blinged-Out Orange Nails
For those who love bling and glamour, this design features bright orange nails with stunning gemstone accents. The combination of orange and green gemstones adds a luxurious touch, perfect for special occasions. The glittery orange accent nail ties the design together, making it both chic and eye-catching.
Consumables
- Base coat: OPI Natural Nail Base Coat
- Bright orange polish: Essie “Tangerine Tease”
- Green polish: OPI “Green Come True”
- Glitter polish: Zoya “Monet”
- Gemstones: Born Pretty Nail Art Rhinestones
- Top coat: Seche Vite Dry Fast Top Coat
- Nail art glue: Mia Secret Nail Art Glue
DIY Instructions
- Apply the base coat and let it dry.
- Paint your nails with two coats of the bright orange polish.
- Use the glitter polish on one accent nail.
- Apply nail art glue to attach the gemstones on another accent nail.
- Finish with a top coat to protect the design and add a glossy finish.
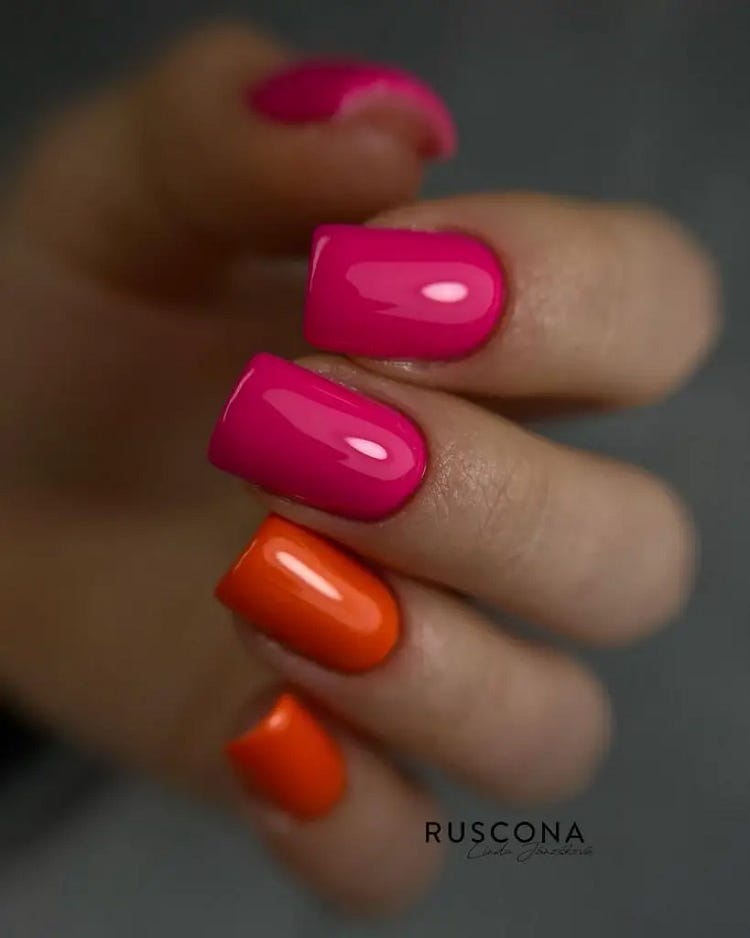
Bold Pink And Orange Combo
This bold design features a striking combination of bright pink and orange nails. The contrast between the two colors creates a vibrant and energetic look, perfect for summer. The square shape of the nails adds a classic touch, while the glossy finish enhances the overall look.
Consumables
- Base coat: OPI Natural Nail Base Coat
- Bright orange polish: Essie “Tangerine Tease”
- Bright pink polish: China Glaze “Neon & On & On”
- Top coat: Seche Vite Dry Fast Top Coat
- Nail file and buffer: OPI Crystal Nail File
DIY Instructions
- Start with a base coat to protect your nails.
- Paint some nails with the bright orange polish and others with the bright pink polish.
- Apply two coats for each color, allowing them to dry between coats.
- Finish with a top coat to seal the design and add shine.
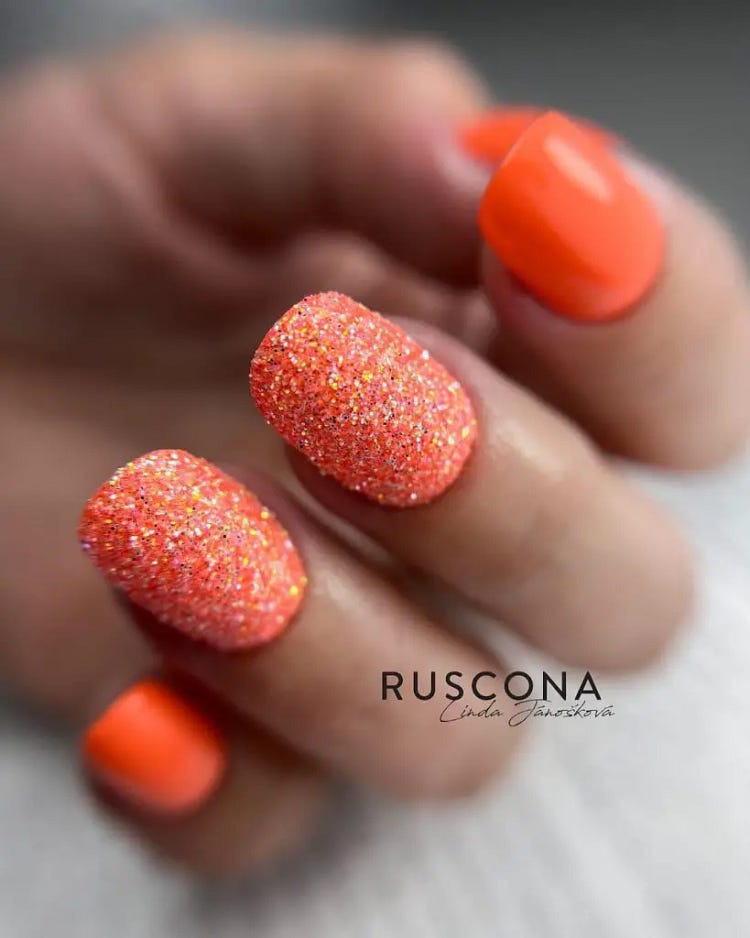
Glittery Coral Delight
This stunning design features a bright orange base with a dazzling coral glitter accent nail. The mix of bright polish and shimmering glitter creates a lively and festive look, perfect for summer parties. The contrast between the smooth, glossy nails and the textured glitter adds depth and interest to this design.
Consumables
- Base coat: OPI Natural Nail Base Coat
- Bright orange polish: Essie “Tangerine Tease”
- Coral glitter polish: Zoya “Ari”
- Top coat: Seche Vite Dry Fast Top Coat
- Nail art brushes: Winstonia Fine Nail Art Brush Set
DIY Instructions
- Apply the base coat and let it dry.
- Paint most of your nails with two coats of the bright orange polish.
- For the accent nail, apply two coats of the coral glitter polish.
- Finish with a top coat to seal the design and add shine.
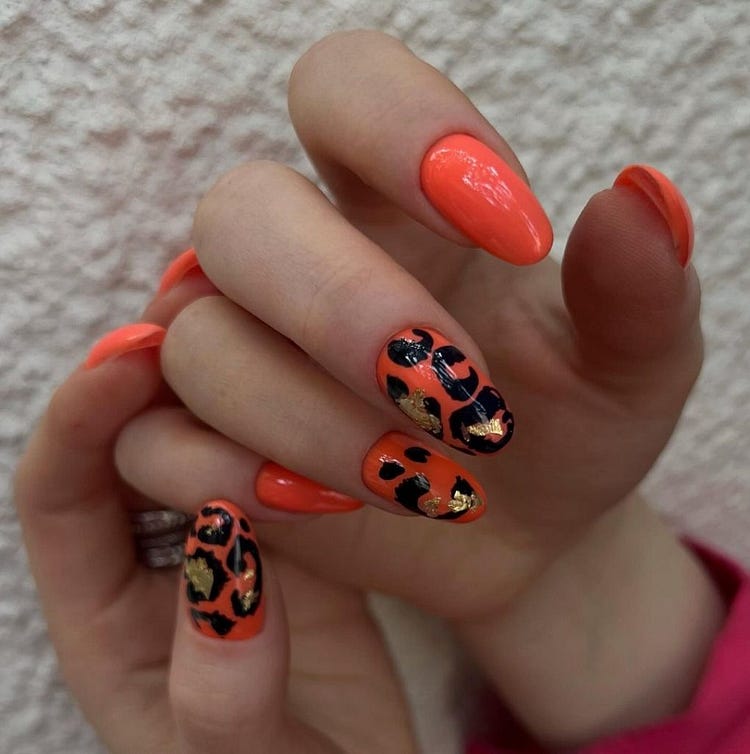
Leopard Print On Bright Orange
This trendy nail design features a vibrant orange base with bold leopard print accents. The combination of bright orange and black with gold details gives a chic and wild look. The almond shape adds elegance, while the leopard print makes a fashion statement.
Consumables
- Base coat: OPI Natural Nail Base Coat
- Bright orange polish: Essie “Tangerine Tease”
- Black polish: Sally Hansen “Black Out”
- Gold foil: Born Pretty Gold Foil Flakes
- Top coat: Seche Vite Dry Fast Top Coat
- Nail art brushes: Beetles Fine Nail Art Brush Set
DIY Instructions
- Apply the base coat and let it dry.
- Paint your nails with two coats of the bright orange polish.
- Use the black polish and a fine nail art brush to create the leopard print spots.
- Apply gold foil flakes within the spots for a touch of glam.
- Finish with a top coat to seal the design and add shine.
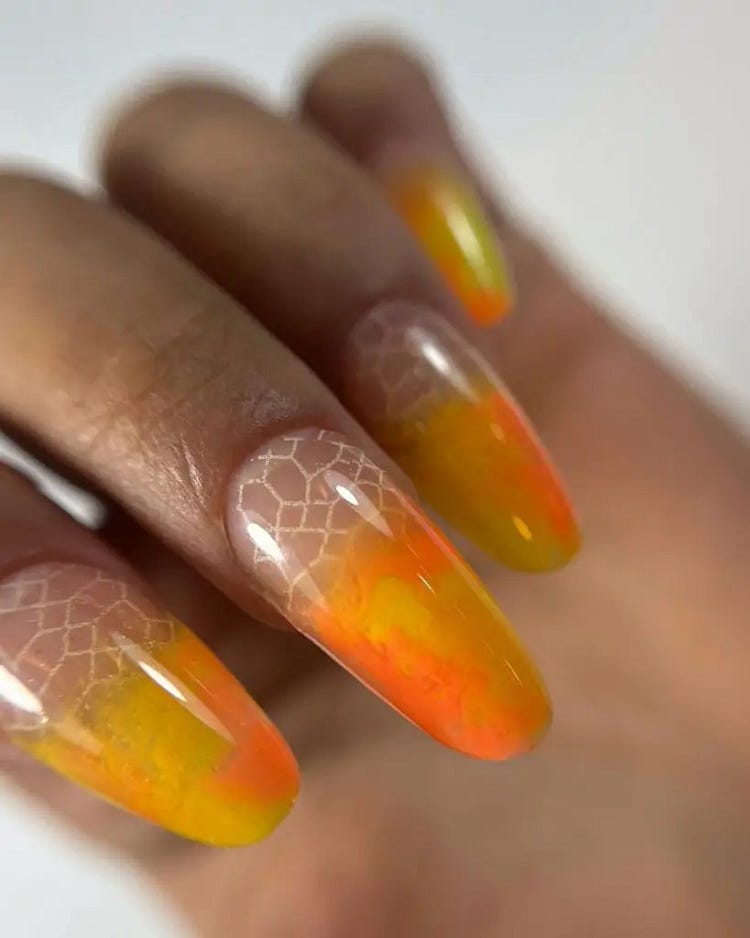
Sunset Gradient Nails
This summer orange nails design mimics a beautiful sunset with a gradient from yellow to orange. The addition of white geometric patterns adds a modern twist, making the design both elegant and trendy. This look is perfect for those who love intricate details and vibrant colors.
Consumables
- Base coat: OPI Natural Nail Base Coat
- Yellow polish: China Glaze “Happy Go Lucky”
- Orange polish: Essie “Tangerine Tease”
- White nail art pen: Sally Hansen I Heart Nail Art Pen in White
- Top coat: Seche Vite Dry Fast Top Coat
- Nail art sponges: Beetles Nail Art Sponges
DIY Instructions
- Apply the base coat and let it dry.
- Create a gradient effect using the yellow and orange polishes with a sponge.
- Once dry, use the white nail art pen to draw geometric patterns.
- Finish with a top coat to protect the design and add shine.
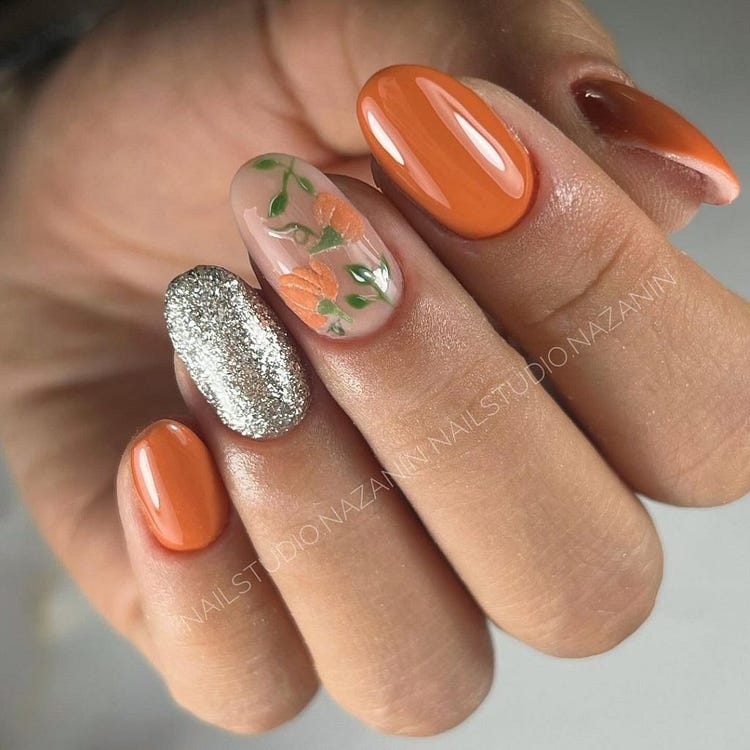
Floral And Glitter Mix
This cute and elegant design combines bright orange nails with a floral accent and a glittery silver accent. The combination of orange, floral art, and glitter makes this design versatile and perfect for any summer event. The short, rounded shape adds a practical yet stylish touch.

Consumables
- Base coat: OPI Natural Nail Base Coat
- Bright orange polish: Essie “Tangerine Tease”
- Silver glitter polish: Zoya “Trixie”
- Floral nail stickers: Born Pretty Floral Stickers
- Top coat: Seche Vite Dry Fast Top Coat
- Nail art brushes: Winstonia Fine Nail Art Brush Set
DIY Instructions
- Apply the base coat and let it dry.
- Paint most of your nails with two coats of the bright orange polish.
- Apply the silver glitter polish to one accent nail.
- Use floral stickers on another accent nail.
- Finish with a top coat to seal the design and add shine.
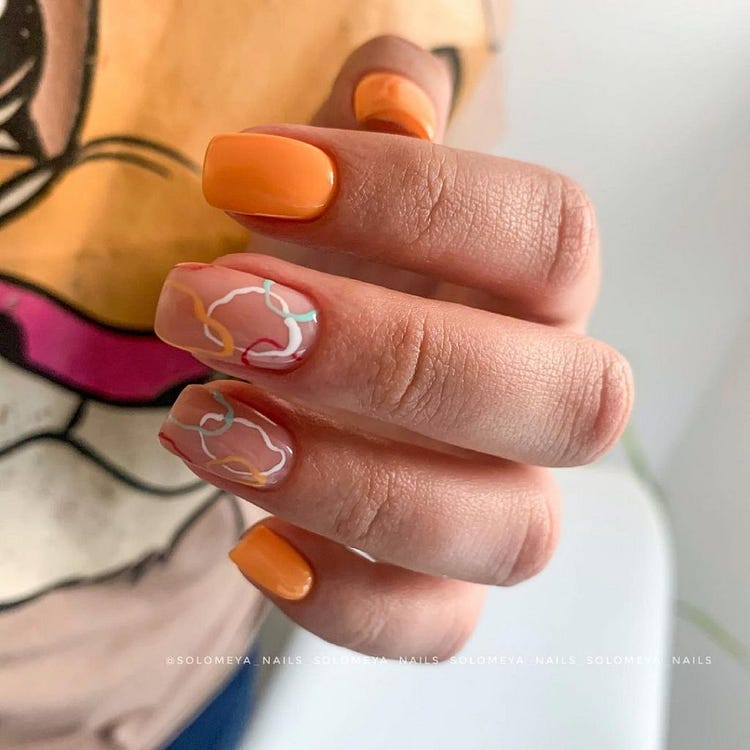
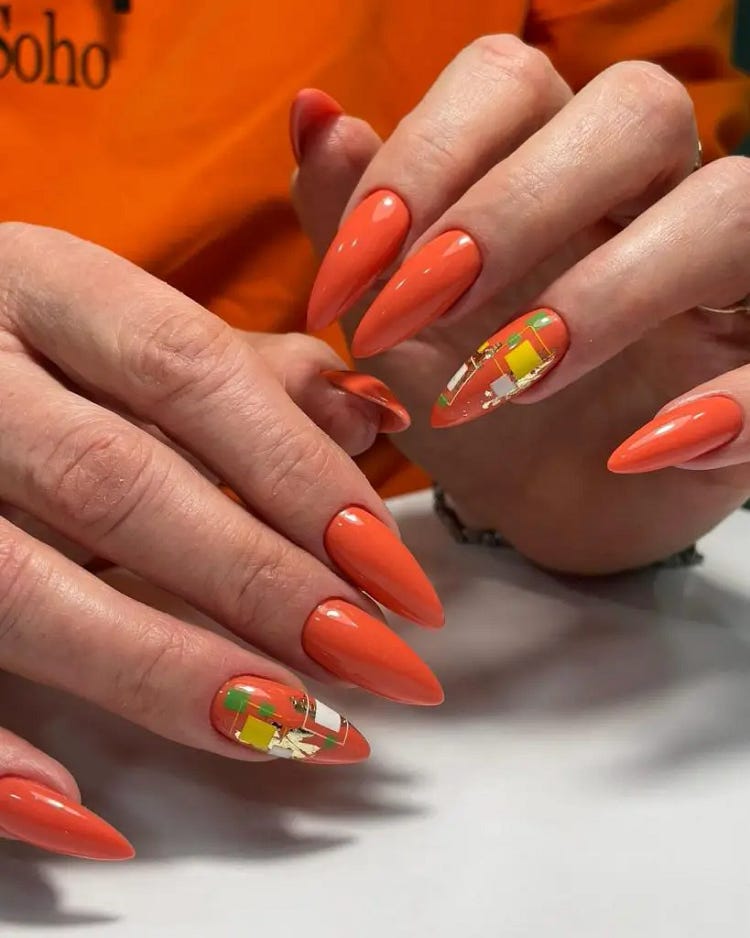
Abstract Orange Art
This design features a bright orange base with abstract art on the accent nails. The mix of orange and nude bases with abstract lines in different colors creates a modern and artistic look. This design is perfect for those who love unique and trendy nail art.
Consumables
- Base coat: OPI Natural Nail Base Coat
- Bright orange polish: Essie “Tangerine Tease”
- Nude polish: OPI “Samoan Sand”
- Colored nail art pens: Sally Hansen I Heart Nail Art Pens in various colors
- Top coat: Seche Vite Dry Fast Top Coat
- Nail art brushes: Beetles Fine Nail Art Brush Set
DIY Instructions
- Apply the base coat and let it dry.
- Paint most of your nails with the bright orange polish and the accent nails with the nude polish.
- Use colored nail art pens to draw abstract lines on the accent nails.
- Finish with a top coat to protect the design and add shine.
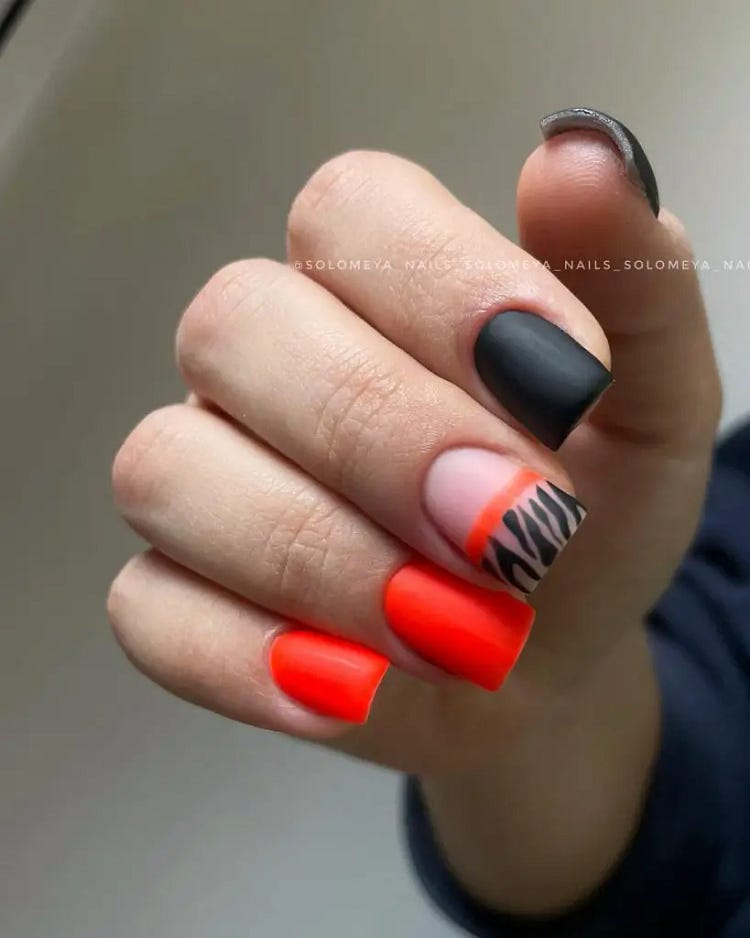
Neon And Matte Zebra
This edgy design combines neon orange with a matte black finish and zebra print accents. The mix of textures and patterns creates a bold and modern look. The neon orange adds a pop of color, while the matte black provides a chic contrast. The zebra print French tip on the accent nail adds a wild and trendy touch.
Consumables
- Base coat: OPI Natural Nail Base Coat
- Neon orange polish: China Glaze “Neon & On & On”
- Matte black polish: OPI “Black Onyx” with matte top coat
- White polish: OPI “Alpine Snow”
- Black nail art pen: Sally Hansen I Heart Nail Art Pen in Black
- Top coat: Seche Vite Dry Fast Top Coat
- Nail art brushes: Beetles Fine Nail Art Brush Set
DIY Instructions
- Apply the base coat and let it dry.
- Paint some nails with the neon orange polish and others with the matte black polish.
- For the accent nail, paint a nude base and create a zebra print French tip using the white polish and black nail art pen.
- Finish with a top coat on the neon nails to add shine and a matte top coat on the black nails.
Geometric Gold And Orange
This elegant design features bright orange nails with geometric gold foil accents. The almond shape adds sophistication, while the gold foil provides a luxurious touch. This design is perfect for those who love a mix of bold color and delicate detailing.
Consumables
- Base coat: OPI Natural Nail Base Coat
- Bright orange polish: Essie “Tangerine Tease”
- Gold foil: Born Pretty Gold Foil Flakes
- Top coat: Seche Vite Dry Fast Top Coat
- Nail art glue: Mia Secret Nail Art Glue
- Nail art brushes: Winstonia Fine Nail Art Brush Set
DIY Instructions
- Apply the base coat and let it dry.
- Paint your nails with two coats of the bright orange polish.
- Apply nail art glue and place the gold foil flakes in a geometric pattern.
- Finish with a top coat to seal the design and add shine.
Soft Coral Elegance
This simple yet sophisticated design features a soft coral orange polish on short, square-shaped nails. The high-gloss finish adds a touch of elegance, making this design perfect for everyday wear. The subtle color is versatile and complements any outfit.
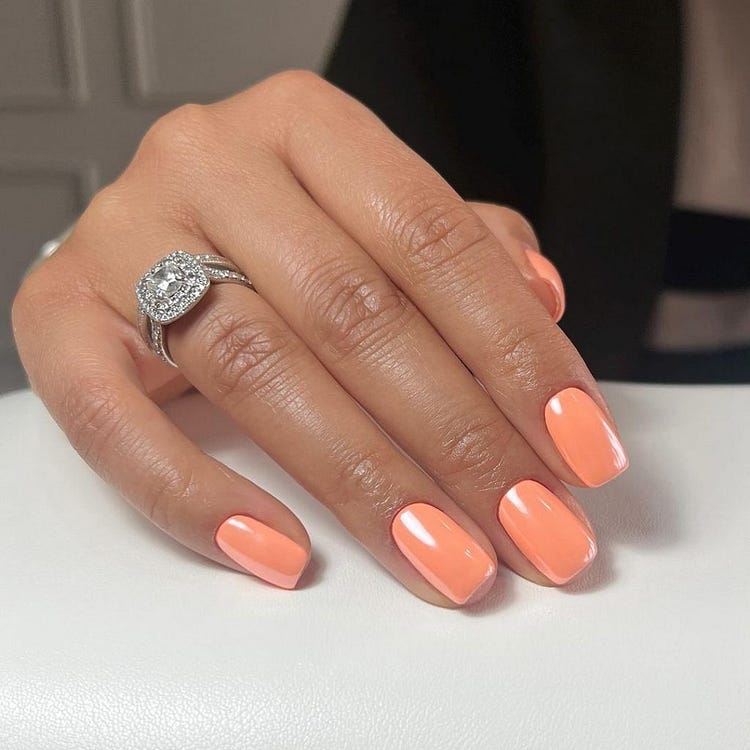
Consumables
- Base coat: OPI Natural Nail Base Coat
- Soft coral polish: OPI “Crawfishin’ for a Compliment”
- Top coat: Seche Vite Dry Fast Top Coat
- Nail file and buffer: OPI Crystal Nail File
DIY Instructions
- Apply the base coat and let it dry.
- Paint your nails with two coats of the soft coral polish.
- Allow the polish to dry between coats.
- Finish with a top coat for a glossy finish.
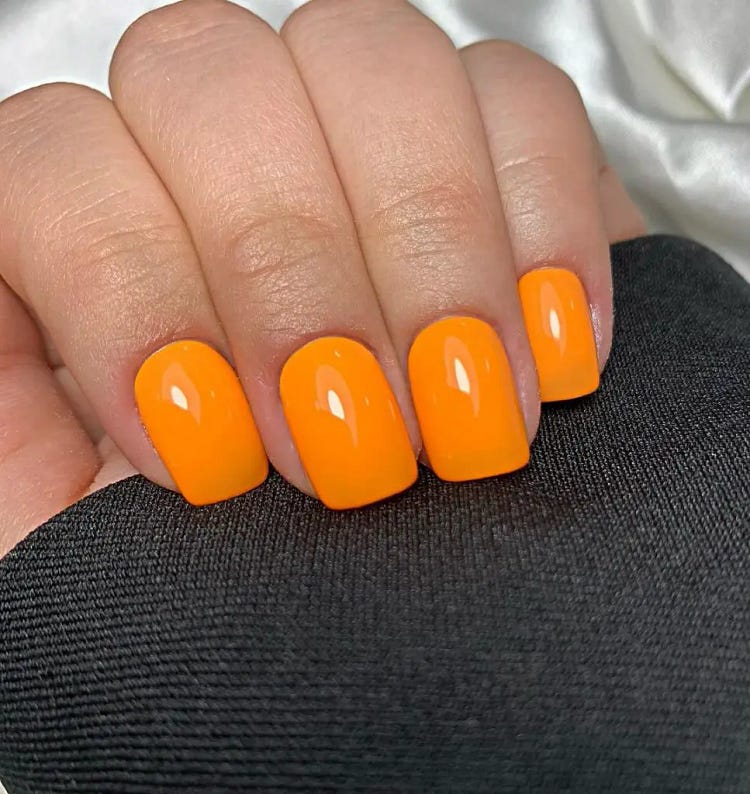
Bright Yellow-Orange Pop
This vibrant design features a bright yellow-orange polish on short, square-shaped nails. The neon-like brightness makes this design perfect for summer, adding a pop of color to any look. The high-gloss finish enhances the boldness of the color.

Consumables
- Base coat: OPI Natural Nail Base Coat
- Bright yellow-orange polish: Essie “Bright Cider Life”
- Top coat: Seche Vite Dry Fast Top Coat
- Nail file and buffer: OPI Crystal Nail File
DIY Instructions
- Apply the base coat and let it dry.
- Paint your nails with two coats of the bright yellow-orange polish.
- Allow the polish to dry between coats.
- Finish with a top coat for a glossy finish.
Orange Neon Delight
This design features a bright neon orange polish on short, square nails, creating a bold and eye-catching look. The neon finish is perfect for summer, providing a vibrant and energetic style. The high-gloss top coat adds an extra layer of shine, making the color pop even more.
Consumables
- Base coat: OPI Natural Nail Base Coat
- Neon orange polish: China Glaze “Neon & On & On”
- Top coat: Seche Vite Dry Fast Top Coat
- Nail file and buffer: OPI Crystal Nail File
DIY Instructions
- Apply the base coat and let it dry.
- Paint your nails with two coats of the neon orange polish.
- Allow the polish to dry between coats.
- Finish with a top coat for a glossy finish.
Modern Block Colors
This design showcases a modern take on the classic French manicure with a twist of block colors. The nails feature a bright orange matte finish on some nails, while others display a combination of light blue, white, and nude shades in a geometric pattern. The clean lines and sharp contrasts make this design both bold and sophisticated.
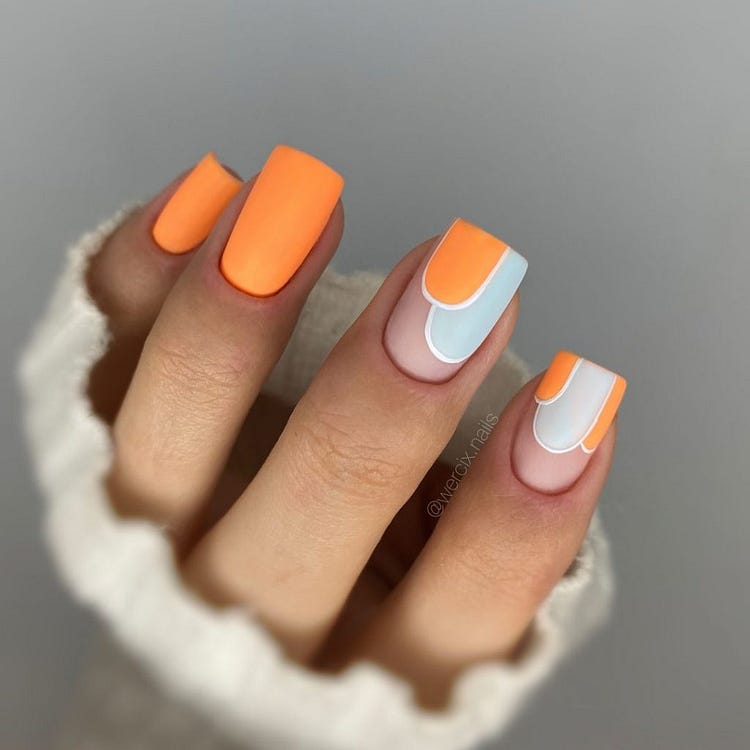
Consumables
- Base coat: OPI Natural Nail Base Coat
- Bright orange polish: Essie “Tangerine Tease”
- Light blue polish: OPI “Gelato On My Mind”
- White polish: OPI “Alpine Snow”
- Nude polish: OPI “Samoan Sand”
- Matte top coat: Essie Matte About You
- Top coat: Seche Vite Dry Fast Top Coat
- Nail art brushes: Winstonia Fine Nail Art Brush Set
DIY Instructions
- Apply the base coat and let it dry.
- Paint some nails with the bright orange polish and apply a matte top coat.
- For the geometric pattern, use the nude polish as a base.
- Apply the light blue and white polishes using a fine nail art brush to create the block design.
- Finish with a top coat on the geometric nails to seal the design and add shine.


No comments:
Post a Comment