Discover the essence of summer with the latest summer french nails designs & colors ideas. This season, think neon coral art combined with gel for a bright and eye-catching look. Embrace long square tips painted in vivid shades of hot pink and light blue, perfect for days spent at the beach or nights out in the city. These manicures art ideas blend classic elegance with modern flair
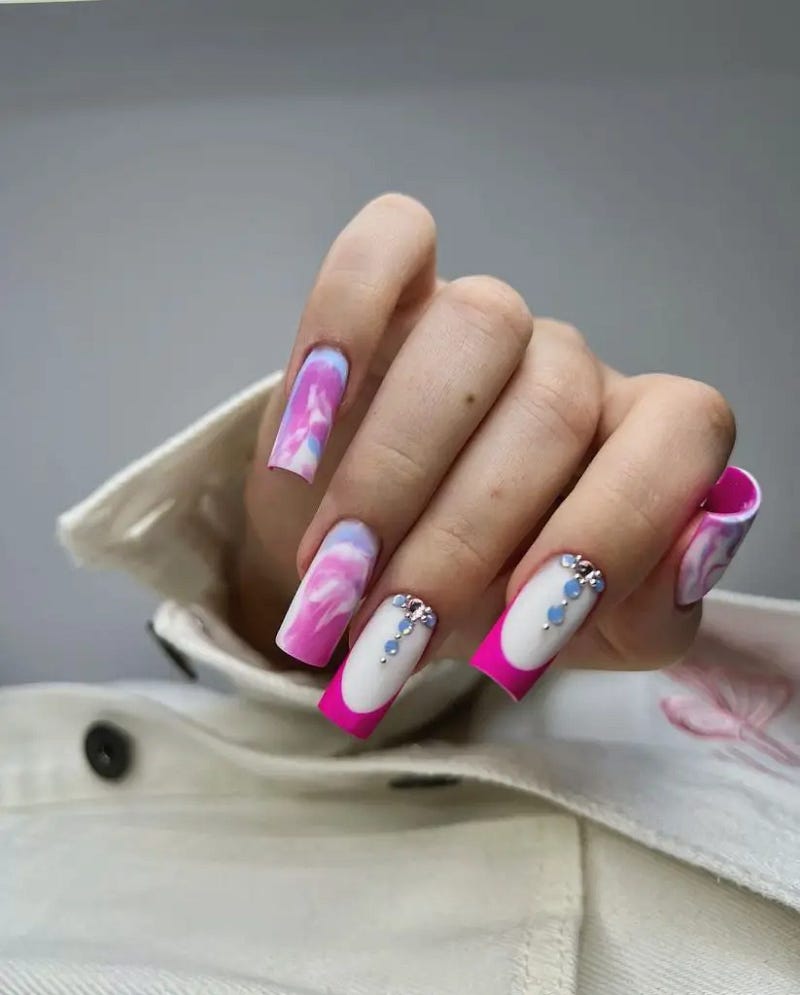
Edgy Blue Smoke Art
This artistic design features a mesmerizing smoky effect in shades of blue on a white base, resembling swirling ocean waves. It’s a bold and expressive choice for those who love to showcase their creativity through their nail art.
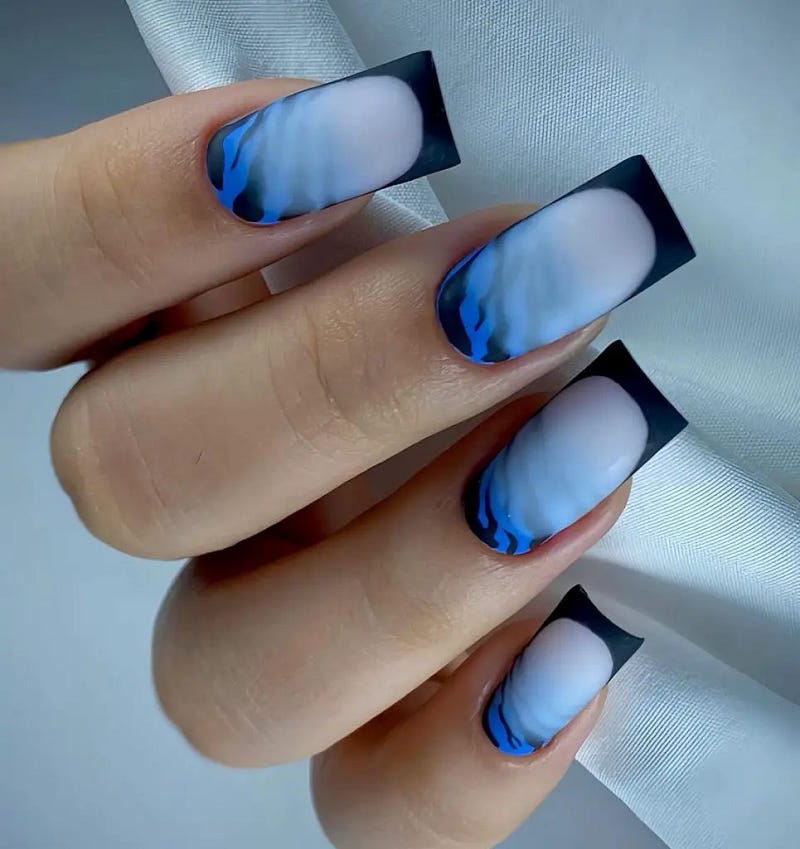
Consumables Needed
- Base Coat: Essie Strong Start
- White Polish: OPI “Alpine Snow”
- Blue Acrylic Paint: For the smoky effect
- Top Coat: Sally Hansen Miracle Gel Top Coat
Expert Tip: Use a fine brush to swirl the blue acrylic paint gently over the white base to create the smoky look.
DIY Instructions
- Begin with a base coat to protect your nails.
- Apply a white polish as the base color.
- Dip a fine brush in blue acrylic paint and gently swirl it on the nail for a smoky effect.
- Seal the design with a glossy top coat for durability.
Abstract Zebra French Tips
These nails transform the traditional French tip into an artistic expression with abstract zebra patterns over a pale pink base. The intricate black and white design adds a wild yet elegant touch to the overall look.
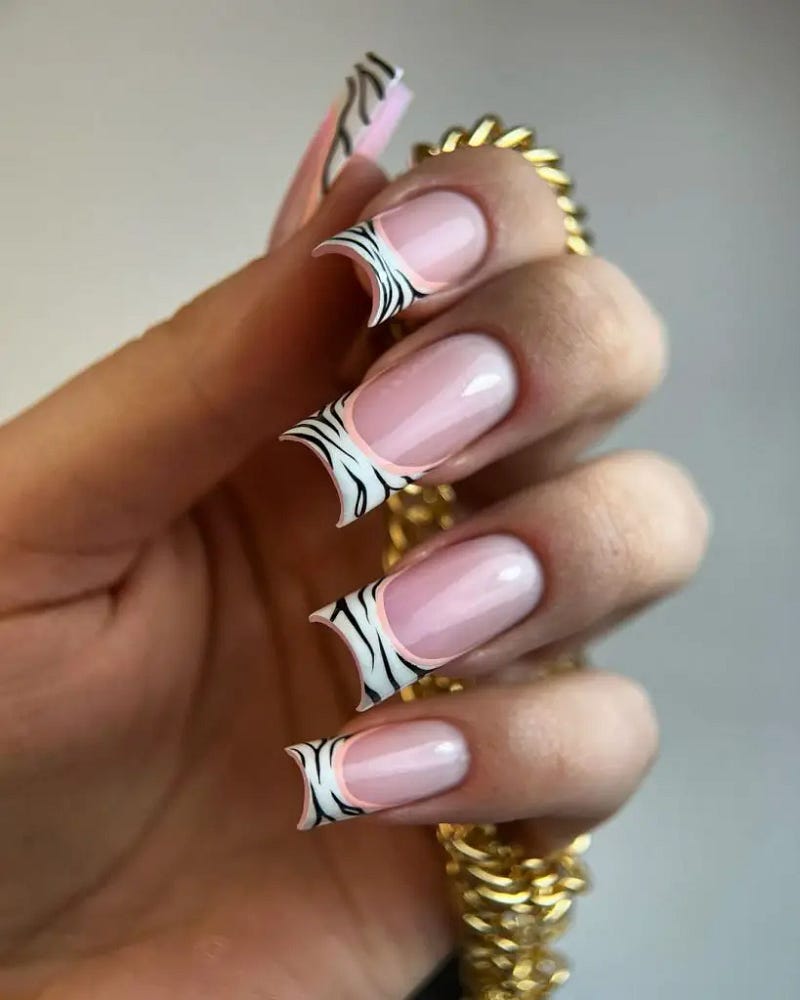
Consumables Needed
- Base Coat: OPI Natural Base Coat
- Pale Pink Polish: Essie “Mademoiselle”
- Black and White Polish: For detailing
- Top Coat: Seche Vite Dry Fast Top Coat
Expert Tip: Steady hands are required to paint the fine lines of the zebra pattern, or use pre-made stickers for an easier application.
DIY Instructions
- Start with a base coat to protect the nails.
- Apply a pale pink polish as the base color.
- Use black and white polishes to create the zebra patterns at the tips.
- Finish with a top coat to seal the design and enhance the gloss.
Romantic Red
Featuring a deep red gradient and white accents, this design is perfect for a romantic evening or special occasion. Tiny gemstones and a sculptural bow on the finger make the look more statement-making.
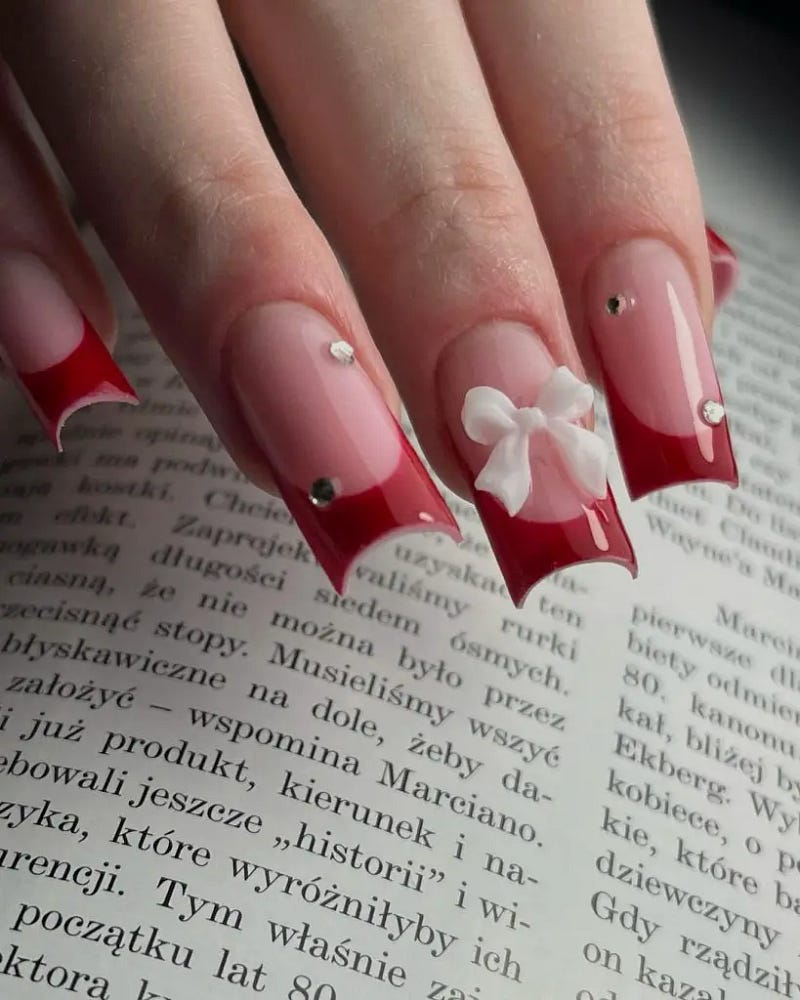
Consumables Needed
- Base Coat: Essie Strong Start
- Red Gradient Polish: OPI “Big Apple Red”
- White Paint: For floral accents
- Gems and 3D Flower: Nail art decorations
- Top Coat: Sally Hansen Insta-Dri
Expert Tip: Use a sponge for the gradient effect and a fine brush for detailed floral designs.
DIY Instructions
- Apply a base coat for protection.
- Create a red gradient using a sponge.
- Draw delicate white bows and add 3D flower and gemstones on your ring finger.
- Apply a fast-drying top coat for a long-lasting finish.
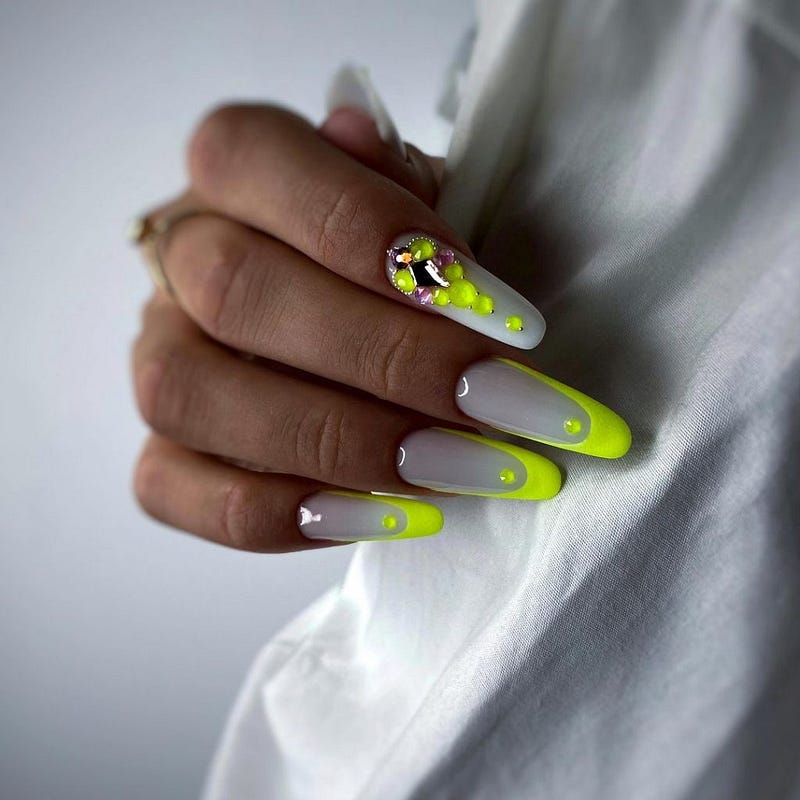
Neon And Nude Artistry
This eye-catching design cleverly balances bold neon yellow accents with a nude base, creating a standout summer look. It’s particularly suitable for festival seasons or any occasion that calls for a touch of fun and flair.
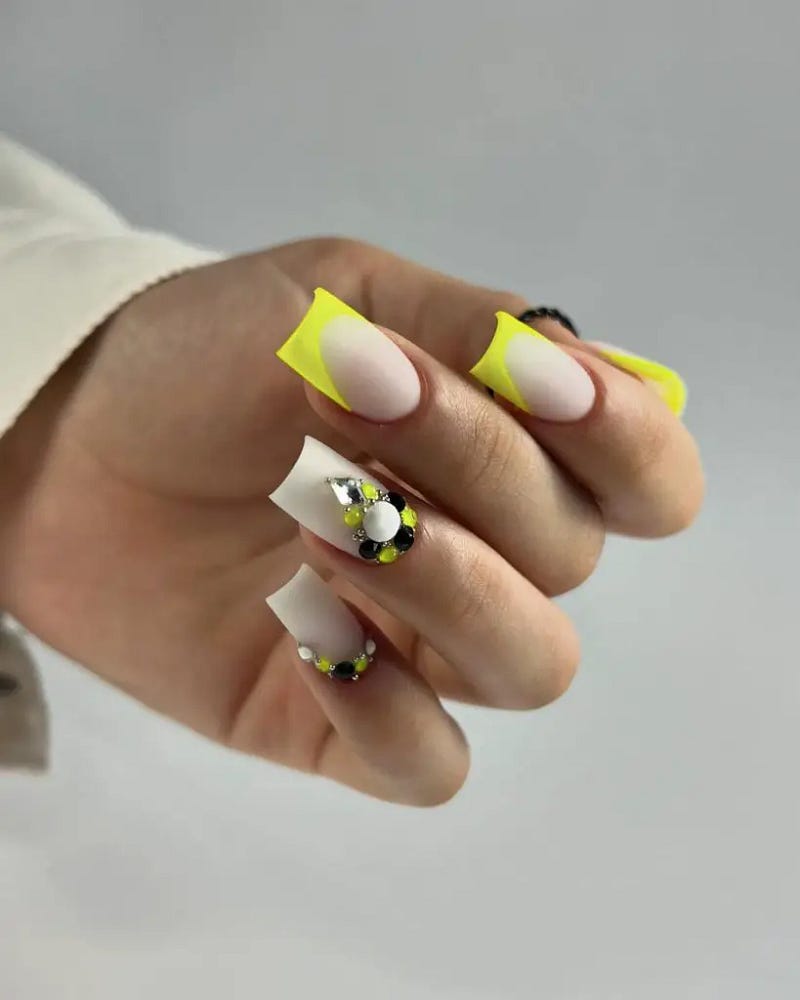
Consumables Needed
- Base Coat: Essie All-in-One Base
- Nude Polish: Essie “Bare With Me”
- Neon Yellow Polish: American Apparel “Neon Yellow”
- Detailing Brush: Fine nail art brush
- Top Coat: OPI RapidDry Top Coat
Expert Tip: Use a detailing brush for precise neon accents.
DIY Instructions
- Start with a base coat to prevent staining.
- Apply two coats of nude polish.
- With a fine brush, add neon details.
- Seal with a fast-drying top coat for a smooth finish.
Pink Marble Majesty
This pink and white marble design, accentuated with silver rhinestones, offers a luxurious look perfect for any summer event. It combines elegance with a playful touch, making it a versatile choice for both daytime and evening wear.
Consumables Needed
- Base Coat: Revlon Quick Dry Base Coat
- White Polish: Zoya “Snow White”
- Pink Swirls: OPI “Pink Flamenco”
- Silver Rhinestones: Small silver nail art rhinestones
- Top Coat: Revlon Extra Life No Chip Top Coat
Expert Tip: Drag a toothpick through spots of pink on the white base to create a natural marble effect.
DIY Instructions
- Apply a base coat to protect your nails.
- Use white as the base color.
- Dot on pink polish and swirl with a toothpick for the marble effect.
- Embellish with rhinestones.
- Apply a top coat for a lasting glossy finish.
Green Pastel With Floral And Gold Flakes
This manicure seamlessly blends pastel green with gold flakes and floral accents, creating a sophisticated yet playful look. The choice of soft green as the base color symbolizes freshness and tranquility, perfect for a summer retreat, while the gold flakes add a touch of luxury.
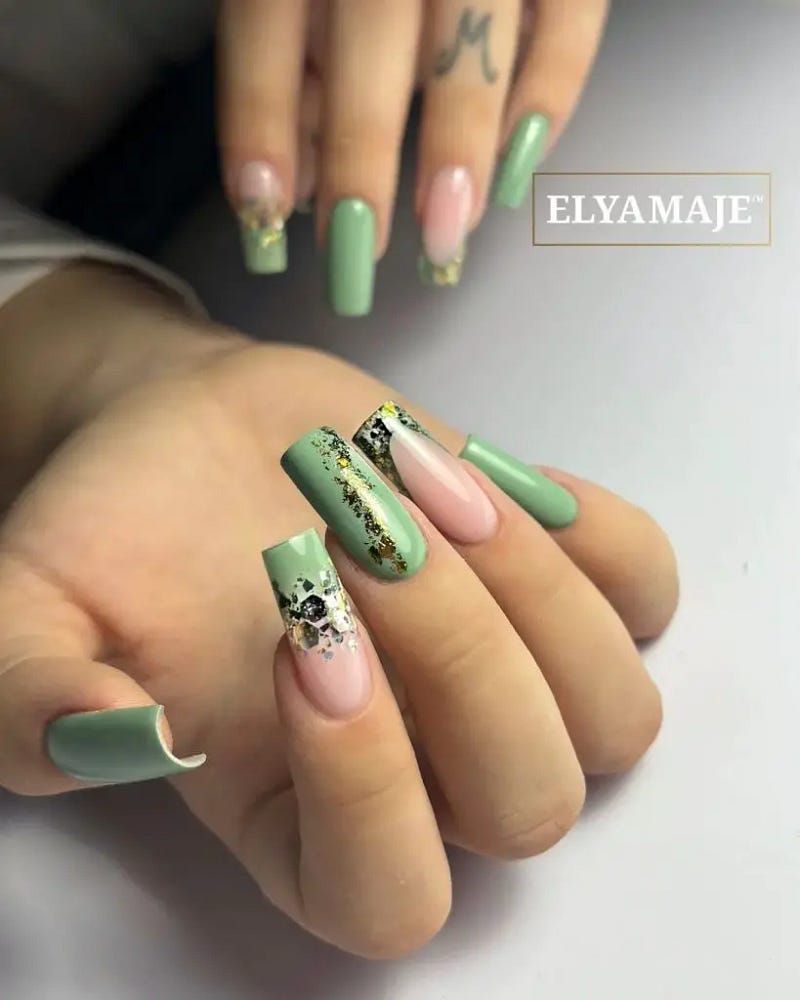
Consumables Needed
- Base Coat: OPI Natural Base Coat
- Pastel Green Polish: Essie “Mint Candy Apple”
- Gold Flake Topper: ILNP “Golden Enchantment”
- Floral Decals: Water-transfer floral nail stickers
- Top Coat: Essie “Good To Go”
Expert Tip: Apply gold flakes sparingly for a delicate shimmer.
DIY Instructions
- Start with a clear base coat to protect your nails.
- Apply two coats of pastel green polish.
- Once dry, add a layer of gold flake topper.
- Position floral decals on the accent nails.
- Finish with a fast-drying top coat for a long-lasting shine.
Soft Gradient With Jewel Accents
This nail design features a soft gradient from a pastel mint to a creamy nude, adorned with subtle jewel accents at the cuticle. It’s an elegant choice that marries minimalism with a hint of sparkle, suitable for both day and evening wear.
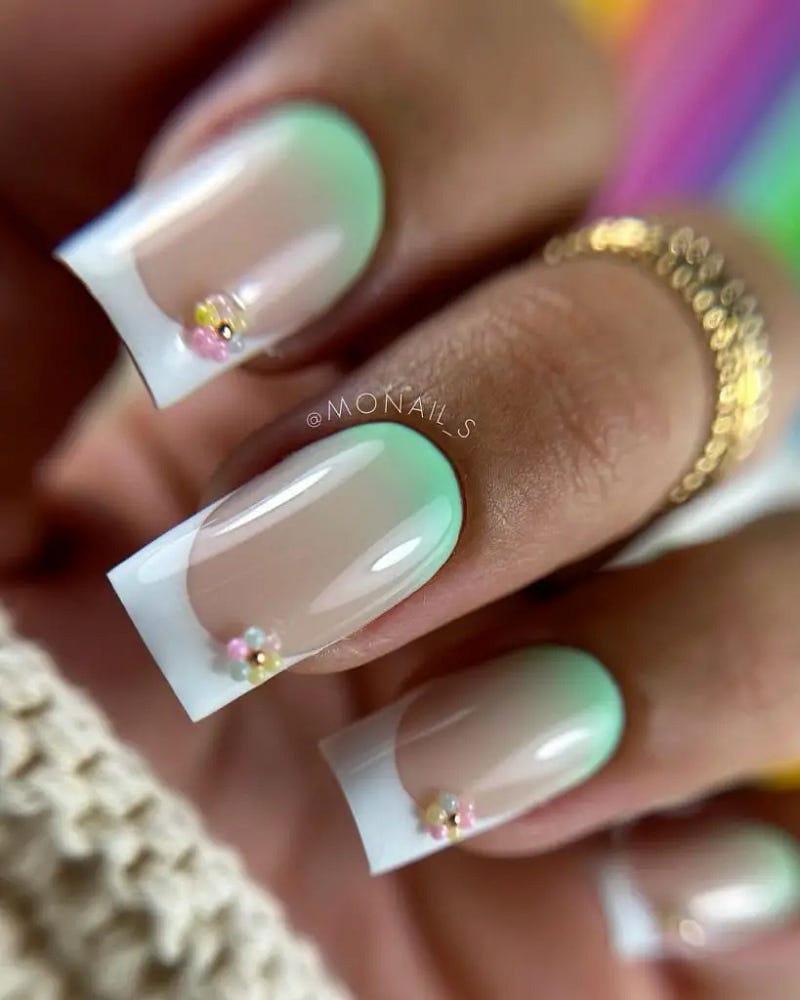
Consumables Needed
- Base Coat: Sally Hansen Double Duty
- Pastel Mint Polish: OPI “That’s Hularious”
- Nude Polish: Zoya “Chantal”
- Micro Jewels: Tiny crystal embellishments
- Top Coat: Seche Vite Dry Fast Top Coat
Expert Tip: Use a makeup sponge to blend the gradient smoothly.
DIY Instructions
- Apply a base coat to protect your nails.
- Paint the whole nail with nude polish.
- Sponge on the pastel mint from the tip down for a gradient effect.
- Add micro jewels at the cuticle area.
- Seal with a top coat for durability and gloss.
Wild Pink With Animal Print
Unleash your wild side with this bold design featuring a pink base and black and white animal print. Perfect for fashion-forward individuals looking to make a statement, this design is completed with vibrant jewel encrusted bands around the tips.
Consumables Needed
- Base Coat: Essie All in One
- Pink Polish: OPI “ElePhantastic Pink”
- Animal Print Stickers: Pre-designed nail stickers
- Jewel Bands: Adhesive gemstone strips
- Top Coat: OPI Top Coat
Expert Tip: Position the animal print stickers carefully to ensure they lie flat against the nail.
DIY Instructions
- Apply a base coat for smooth application.
- Paint your nails with a bright pink shade.
- Apply animal print stickers to the accent nails.
- Adorn the tips with jewel bands.
- Finish with a clear top coat to seal in the design.
Summer Red With Floral Accents
This vibrant red manicure is perfect for summer picnics and beach days, featuring playful white floral designs that give it a fresh and lively look. The use of bold red combined with delicate flowers offers a classic yet updated summer style.
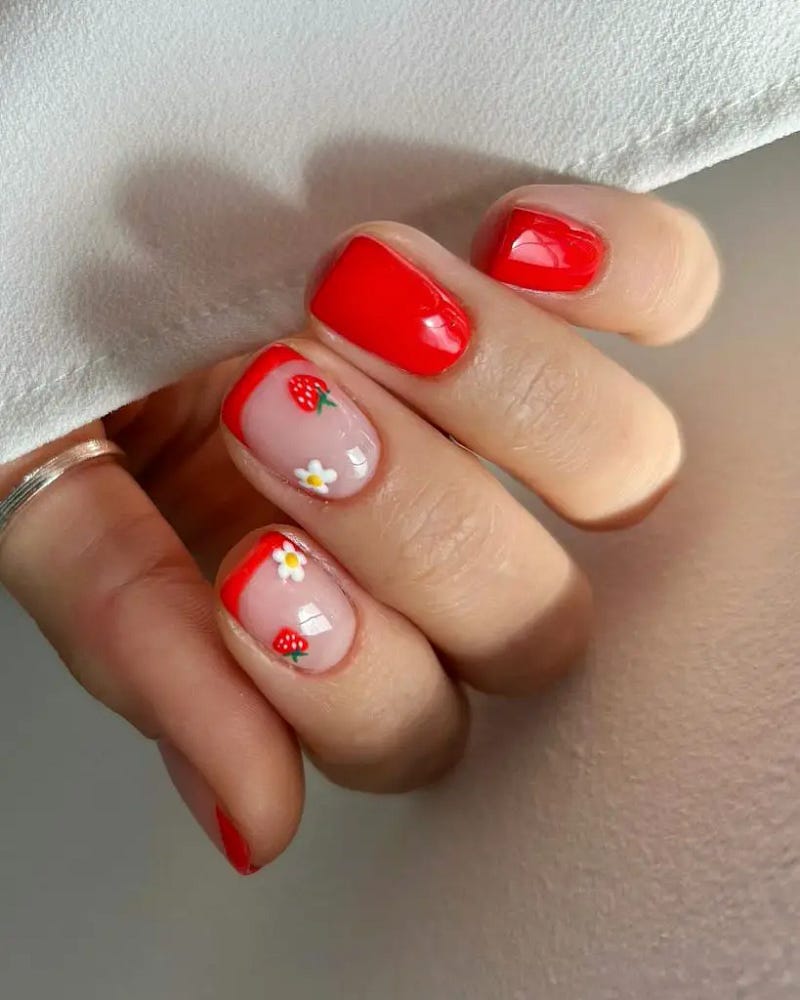
Consumables Needed
- Base Coat: OPI Natural Base Coat
- Red Polish: Essie “Geranium”
- White Art Paint: Acrylic paint for detailed design
- Detailing Brush: Fine-tip nail art brush
- Top Coat: OPI Top Coat
Expert Tip: Use a thin brush for precise floral detailing.
DIY Instructions
- Start with a base coat to protect the nail.
- Apply two coats of red polish for opaque coverage.
- Using white paint and a detailing brush, create small floral patterns.
- Allow to dry thoroughly.
- Apply a glossy top coat for a vibrant finish.
Classic French With A Copper Twist
Redefine the classic French manicure by adding a metallic copper twist at the tips. This subtle yet impactful variation brings a modern edge to a timeless look, making it perfect for those who enjoy a chic update to traditional styles.
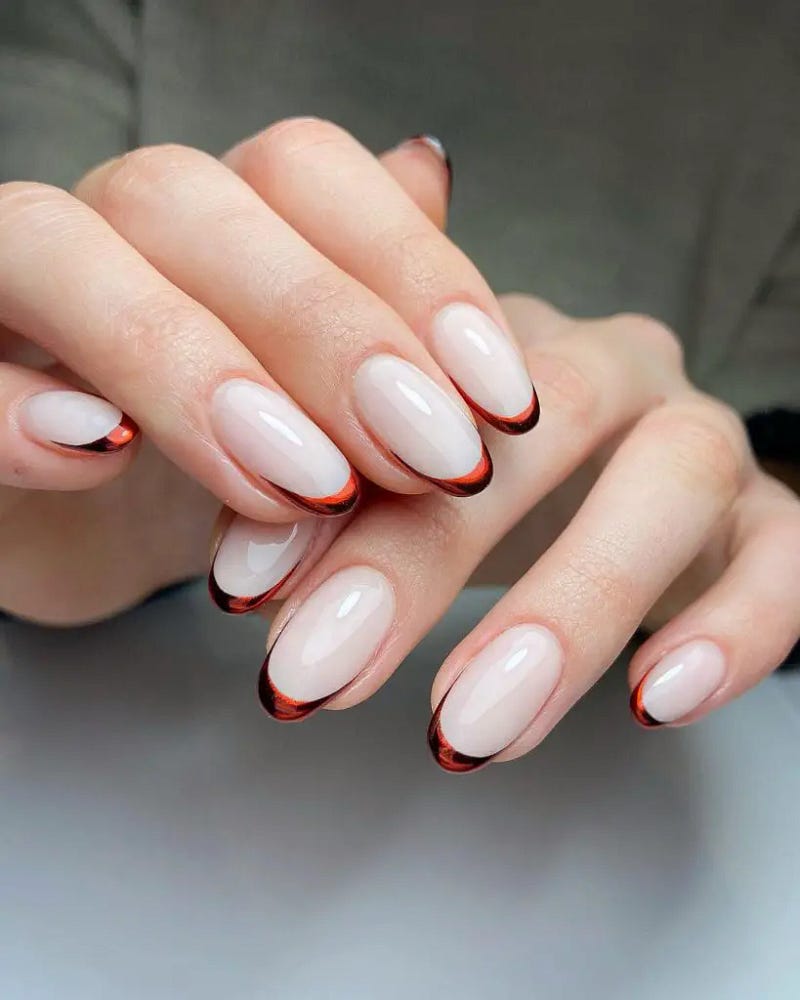
Consumables Needed
- Base Coat: CND Sticky Base Coat
- Nude Polish: OPI “Bubble Bath”
- Copper Striping Tape: Metallic nail tape
- Top Coat: CND Super Shiney Top Coat
Expert Tip: Ensure the striping tape is securely applied to prevent peeling.
DIY Instructions
- Apply a base coat to prep the nails.
- Paint the nails with a nude polish and let them dry completely.
- Apply copper striping tape at the tips.
- Seal everything with a high-gloss top coat for a durable and shiny finish.
Modern Blue French Twist
This fresh take on the classic French tip features a vibrant blue edge against a nude base, creating a stunning visual contrast that’s both modern and chic. It’s a simple yet impactful design perfect for adding a pop of color to your summer look.
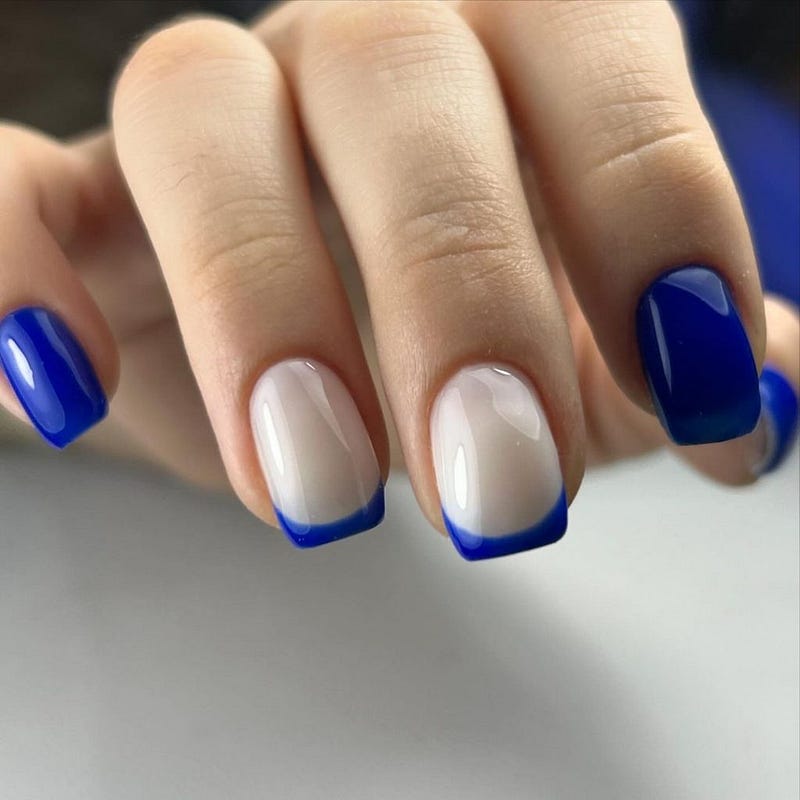
Consumables Needed
- Base Coat: OPI Natural Base Coat
- Nude Polish: Essie “Ballet Slippers”
- Blue Polish: Sally Hansen “Pacific Blue”
- Top Coat: Seche Vite Dry Fast Top Coat
Expert Tip: Use striping tape to achieve the perfect blue tip precision.
DIY Instructions
- Apply the base coat to clean, prepped nails.
- Paint the nails with the nude polish and allow it to dry completely.
- Position striping tape at the tips and apply the blue polish.
- Remove the tape swiftly and finish with a top coat for a glossy finish.
Sophisticated Pink And Black
This sophisticated nail design combines a soft pink base with bold black tips, punctuated by silver studs for an edgy yet elegant look. It’s perfect for someone looking to make a statement with their nails without sacrificing sophistication.
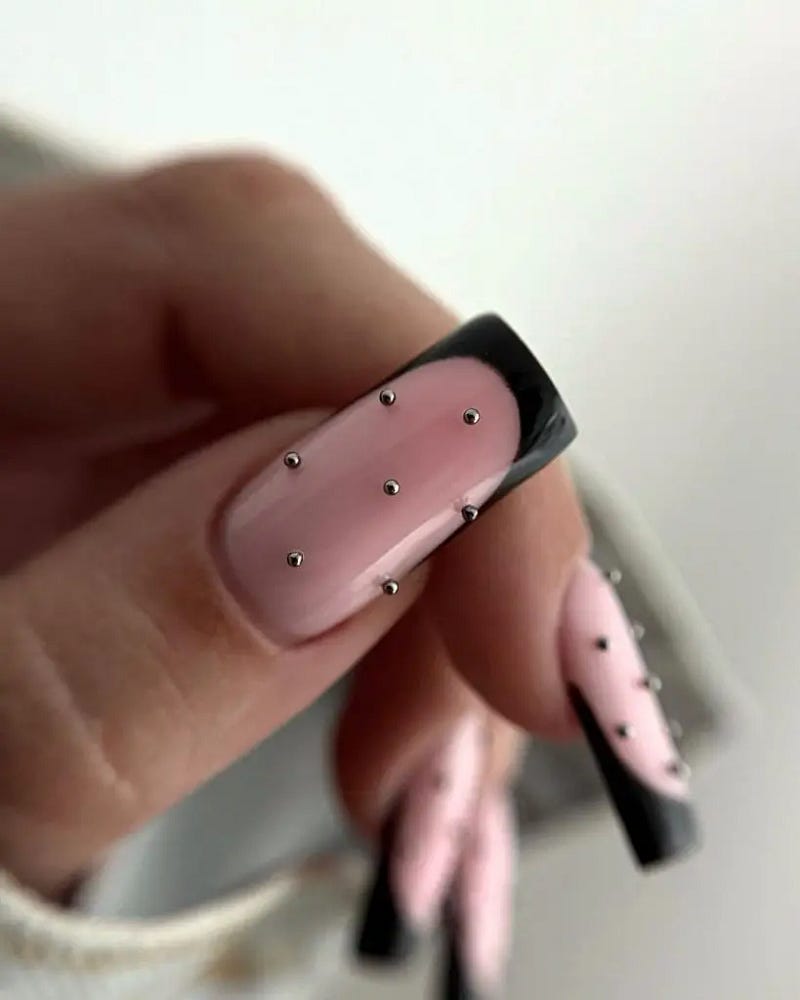
Consumables Needed
- Base Coat: CND Sticky Base Coat
- Pink Polish: Zoya “Jordan”
- Black Polish: Essie “Licorice”
- Silver Studs: Small metallic nail decorations
- Top Coat: OPI Top Coat
Expert Tip: Apply studs using a dot of nail glue for secure placement.
DIY Instructions
- Begin with a base coat to ensure longevity.
- Apply the pink polish as the base color.
- Paint the tips black and add silver studs for a chic look.
- Seal everything with a high-gloss top coat for durability and shine.
Bold Pink With Dramatic Black Accents
This nail design features a vibrant pink base with bold black texture accents on a white tip, showcasing a modern and artistic expression. This daring combination makes a statement and is perfect for those looking to showcase their unique style.
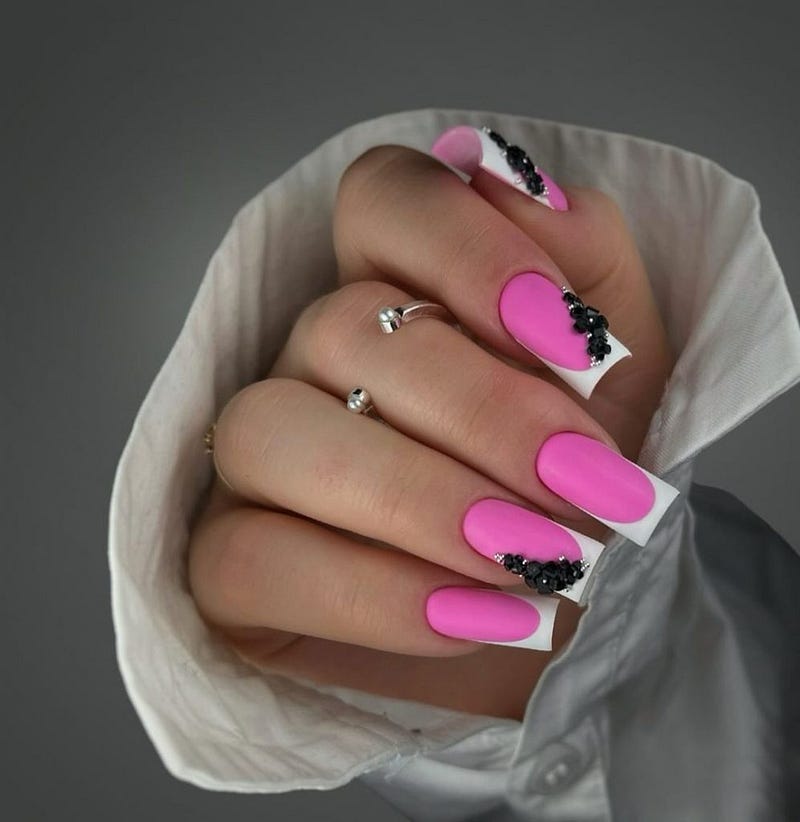
Consumables Needed
- Base Coat: CND Sticky Base Coat
- Pink Polish: OPI “Hotter Than You Pink”
- White Polish: Essie “Blanc”
- Black Textured Polish: Zoya “Dahlia”
- Top Coat: Seche Vite Dry Fast Top Coat
Expert Tip: To create the textured black accents, apply the textured polish with a dabbing motion using a sponge.
DIY Instructions
- Apply a base coat to protect your nails.
- Paint all nails with the vibrant pink polish.
- Once dry, paint the tips white and let dry.
- Dab the textured black polish onto the white tips.
- Finish with a top coat for a glossy and durable finish.
Clean Green French Tips
This chic design reinvents the French tip with a crisp, bold green outline on a pure white base. The minimalist yet striking appearance is suitable for both everyday wear and special occasions, providing a fresh and clean look.
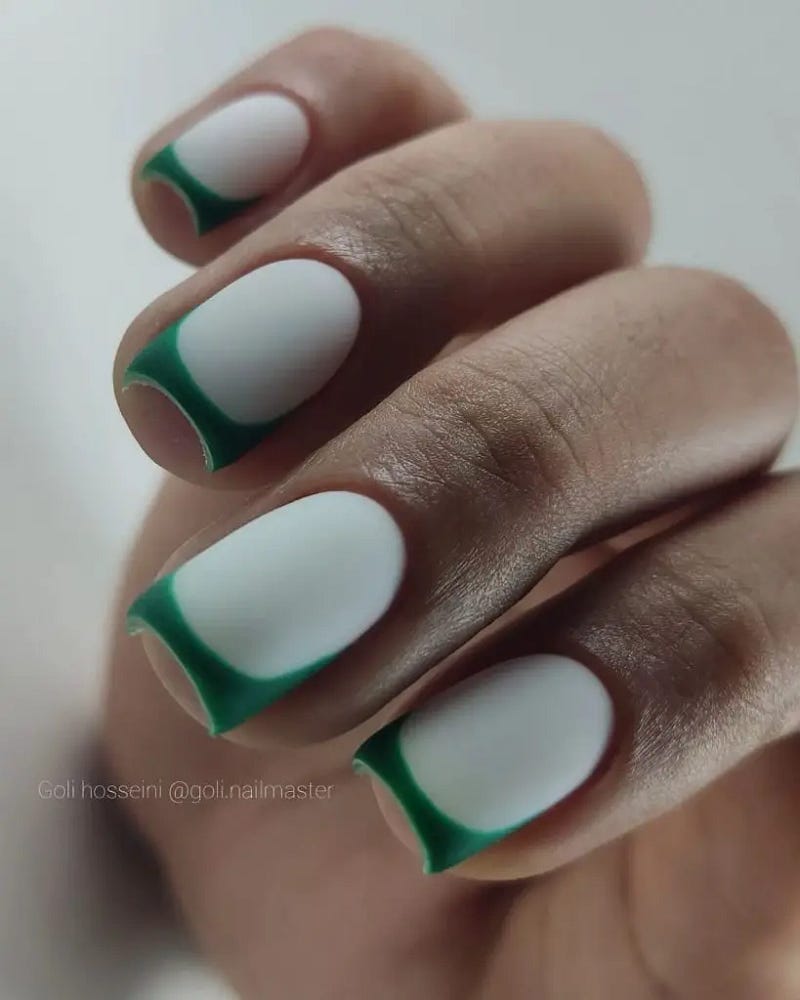
Consumables Needed
- Base Coat: Essie Strong Start
- White Polish: OPI “Alpine Snow”
- Green Polish: Essie “Mojito Madness”
- Top Coat: OPI Top Coat
Expert Tip: Use striping tape to achieve precise and sharp green edges.
DIY Instructions
- Begin with a base coat to protect the nails.
- Apply two coats of white polish as the base color.
- Carefully place striping tape and paint the green tips.
- Remove the tape and seal the design with a top coat.
Playful Pink And Yellow Marbling
Embrace the joy of summer with this playful nail art featuring pink and yellow marbling. The technique involves swirling pink and yellow polishes over a white base, creating a vibrant, fluid look that’s eye-catching and fun.
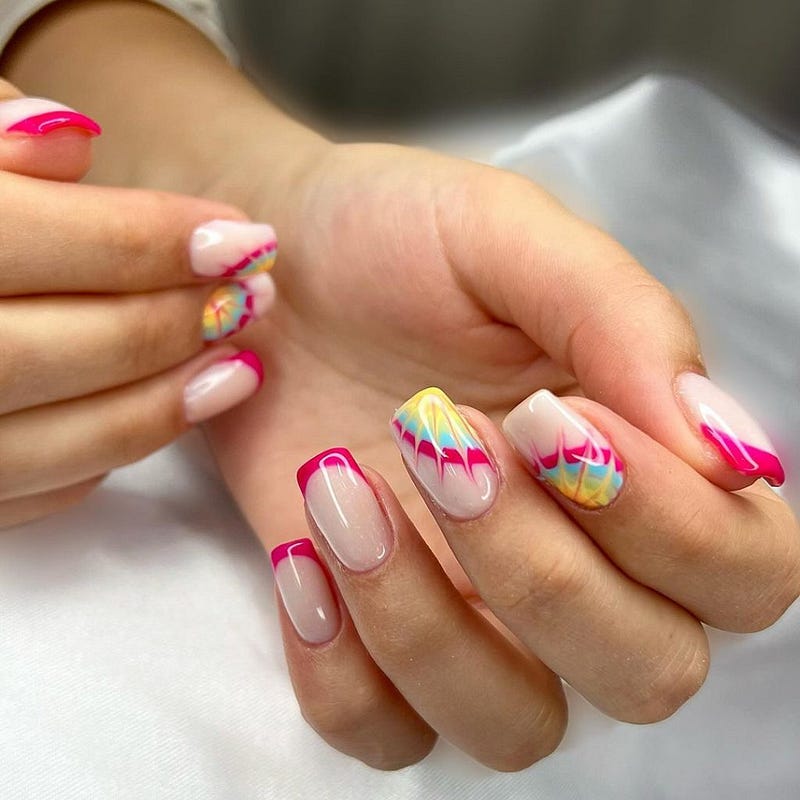
Consumables Needed
- Base Coat: OPI Natural Base Coat
- White Polish: Sally Hansen “White On”
- Pink and Yellow Polish: OPI “Kiss Me I’m Brazilian” and “I Just Can’t Cope-acabana”
- Top Coat: Sally Hansen Insta-Dri
Expert Tip: Use a small nail art brush to swirl the colors gently and achieve the perfect marbling effect.
DIY Instructions
- Start with a base coat.
- Apply a white polish as the base color.
- Drop pink and yellow polish on the wet base and swirl with a nail brush.
- Seal with a top coat for a smooth and lasting finish.
Sophisticated Pink Ombre With Glitter
This sophisticated ombre design transitions from a deep pink to a clear base, interspersed with pink glitter to add a touch of sparkle. This nail art is elegant and perfect for those who prefer a subtle yet glamorous look.
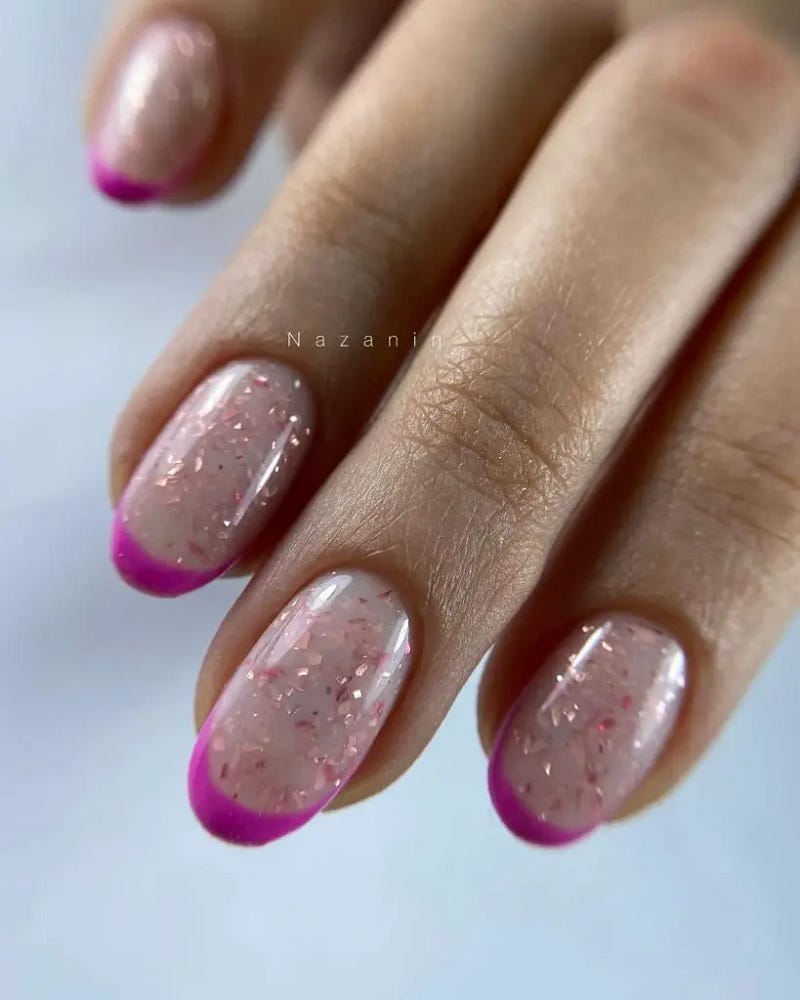
Consumables Needed
- Base Coat: CND Sticky Base Coat
- Pink Polish: Zoya “Maggie”
- Pink Glitter Polish: Essie “A Cut Above”
- Top Coat: Seche Vite Dry Fast Top Coat
Expert Tip: Gradually fade the pink polish into the base for a smooth ombre effect.
DIY Instructions
- Apply a base coat.
- Start with the pink polish at the tip and blend towards the middle.
- Apply pink glitter polish near the tip.
- Finish with a top coat for a dazzling effect.
Neon Glow With White Accents
Stand out with this neon green manicure featuring white accents that glow under UV light. This look is bold and perfect for nightlife or any party scene, ensuring your nails catch every eye in the room.
Consumables Needed
- Base Coat: Essie All in One Base
- Neon Green Polish: China Glaze “I’m With the Lifeguard”
- White Polish: OPI “Alpine Snow”
- Top Coat: OPI UV Top Coat
Expert Tip: Apply the white accents with a dotting tool for precision.


No comments:
Post a Comment